
How to root your RouterOS v7 Virtual Machine
Finding vulnerabilities in RouterOS is tricky, and this is especially because it does not provide a shell environment like ash or bash.
Many vulnerability researchers working on RouterOS felt the same and found various ways to enable the root shell on RouterOS. Unfortunately, most of the methods are no longer available on the latest RouterOS version.
Thankfully, there is a way to jailbreak RouterOS v7 using netboot functionality. This method achieves a root shell by booting through a modified kernel image. However, You need an actual RouterBOARD to use this method, and it is a bit complicated process to generate a modified kernel image and network boot through it.
While researching RouterOS, we eventually wanted to use virtual machines as a testing environment for various reasons. The netboot jailbreak method doesn’t work on virtual machines. So we had to find another way to acheive the root shell, and we did.
This article suggests a simple trick to get a temporary root shell on RouterOS which can only be used on virtual machines and is easy to use.
Previously on RouterOS…
RouterOS has a hidden “devel” login which is only enabled when specific conditions are met. When enabled, RouterOS gives you an ash shell if you login with id “devel” via telnet. Most of the RouterOS jailbreaking methods focus on enabling the “devel” login.
Before RouterOS version 6.41, There were two options to enable the “devel” login feature.
- ‘option’ package is installed.
- /nova/etc/devel-login file exists.
/nova/etc/devel-login was removed in version 6.41. So the only option left is the ‘option’ package.
‘devel’ login on RouterOS v7
When the telnet connection is made, RouterOS uses /nova/bin/login binary for login authentication. This binary contains the code that checks whether the “devel” login option is enabled or not by checking the ‘option’ package.
/nova/bin/login checks if the ‘option’ package is installed by executing nv::hasOptionPackage function. By analyzing /lib/libumsg.so library, you can see that nv::hasOptionPackage is equaviliant to nv::hasPackage(“option”).
In RouterOS v7, nv::hasPackage returns true only when the following conditions are met
- If the target is a symbolic link, it should point to “/bndl/(package_name)” which is located in the read-only file system.
- If the target is not a symbolic link, it should be stored in the read-only(squashfs) file system.
It is hard to bypass the nv::hasPackage function unless we have an arbitrary code execution vulnerability. Even if we somehow managed to pass the nv::hasPackage(“option”) check, the login binary explicitly executes “/pckg/option/bin/bash” as shell which does not exist by default. we still need to somehow write the shell binary on the location.
Simple trick
So, bypassing the “option” package verifying code is not easy, Unless we can change the program code itself. But that would require you to modify the code running on the live memory. That… is impossible. Isn’t it?
Wait, actually it is possible! Of course, it is. It’s a ‘virtual’ machine after all.
What if the login binary checks for an “ipv6” package instead of the “option” package? What if the login binary executes “/rw/disk/bash” as shell instead of “/pckg/option/bin/bash”?
We can make that happen.
How to root your RouterOS VM
What you need:
- Ubuntu VM
- RouterOS x86 ISO Image
- VMWare Workstation
Step:
-
First, install RotuerOS on your VM. After the installation, turn the VM off.
-
Attach RouterOS VM’s Disk to Ubuntu VM
-
Boot the Ubuntu VM, and browse into RouterOS Disk’s volume called ‘RouterOS’. Go to /RW/disk/ and execute the following command to download the busybox binary. Exit the Ubuntu VM.
$ sudo mkdir busybox && cd busybox
$ sudo wget -O ash https://www.busybox.net/downloads/binaries/1.31.0-i686-uclibc/busybox_ASH
$ sudo wget https://www.busybox.net/downloads/binaries/1.31.0-i686-uclibc/busybox
$ chmod a+x ash busybox
-
Boot RouterOS VM and make several login attempts with the invalid credential.
-
Suspend the RouterOS VM. Go to the RouterOS VM folder and open vmem file with hex editor.
-
Find & Replace as follows
Original: 00 2F 62 6E 64 6C 2F 00 6F 70 74 69 6F 6E 00
Replaced: 00 2F 62 6E 64 6C 2F 00 69 70 76 36 00 00 00

Original: 00 2F 70 63 6B 67 2F 6F 70 74 69 6F 6E 2F 62 69 6E 2F 62 61 73 68 00
Replaced: 00 2F 72 77 2F 64 69 73 6B 2F 62 75 73 79 62 6F 78 2F 61 73 68 00 00
-
Save the vmem file. Resume the RouterOS VM
-
Login with devel/(admin’s password)
-
You will get a shell. If not, repeat the process from stage 4.
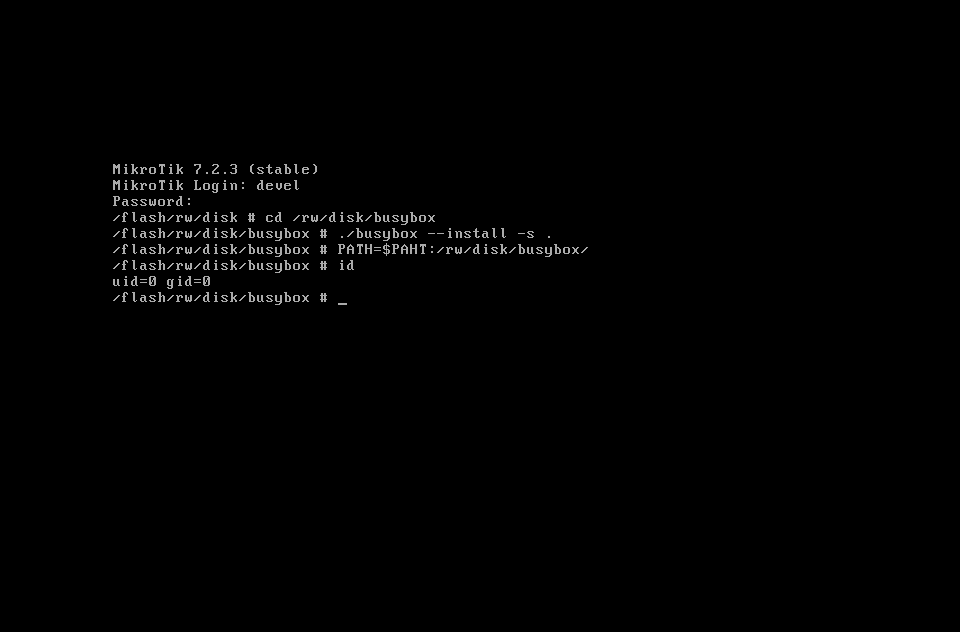
- Execute the following commands to install the busybox.
cd /rw/disk/busybox ./busybox --install -s . PATH=$PATH:/rw/disk/busybox/ - If everything is done correctly, you should get an ash shell with busybox as the screenshot.
Limitation
This is a ‘simple trick’ method and the shell is not persistent. If you reboot the RouterOS VM, you will have to repeat the process from stage 4.